
In deze post leg ik uit hoe je van een basispatroon een patroon voor het bovenlijfje van deze jurk kan maken.
In this post I explain how you can change the pattern of a basic bodice into a pattern for the bodice of this dress.
–
Wat heb je nodig? – What do you need?
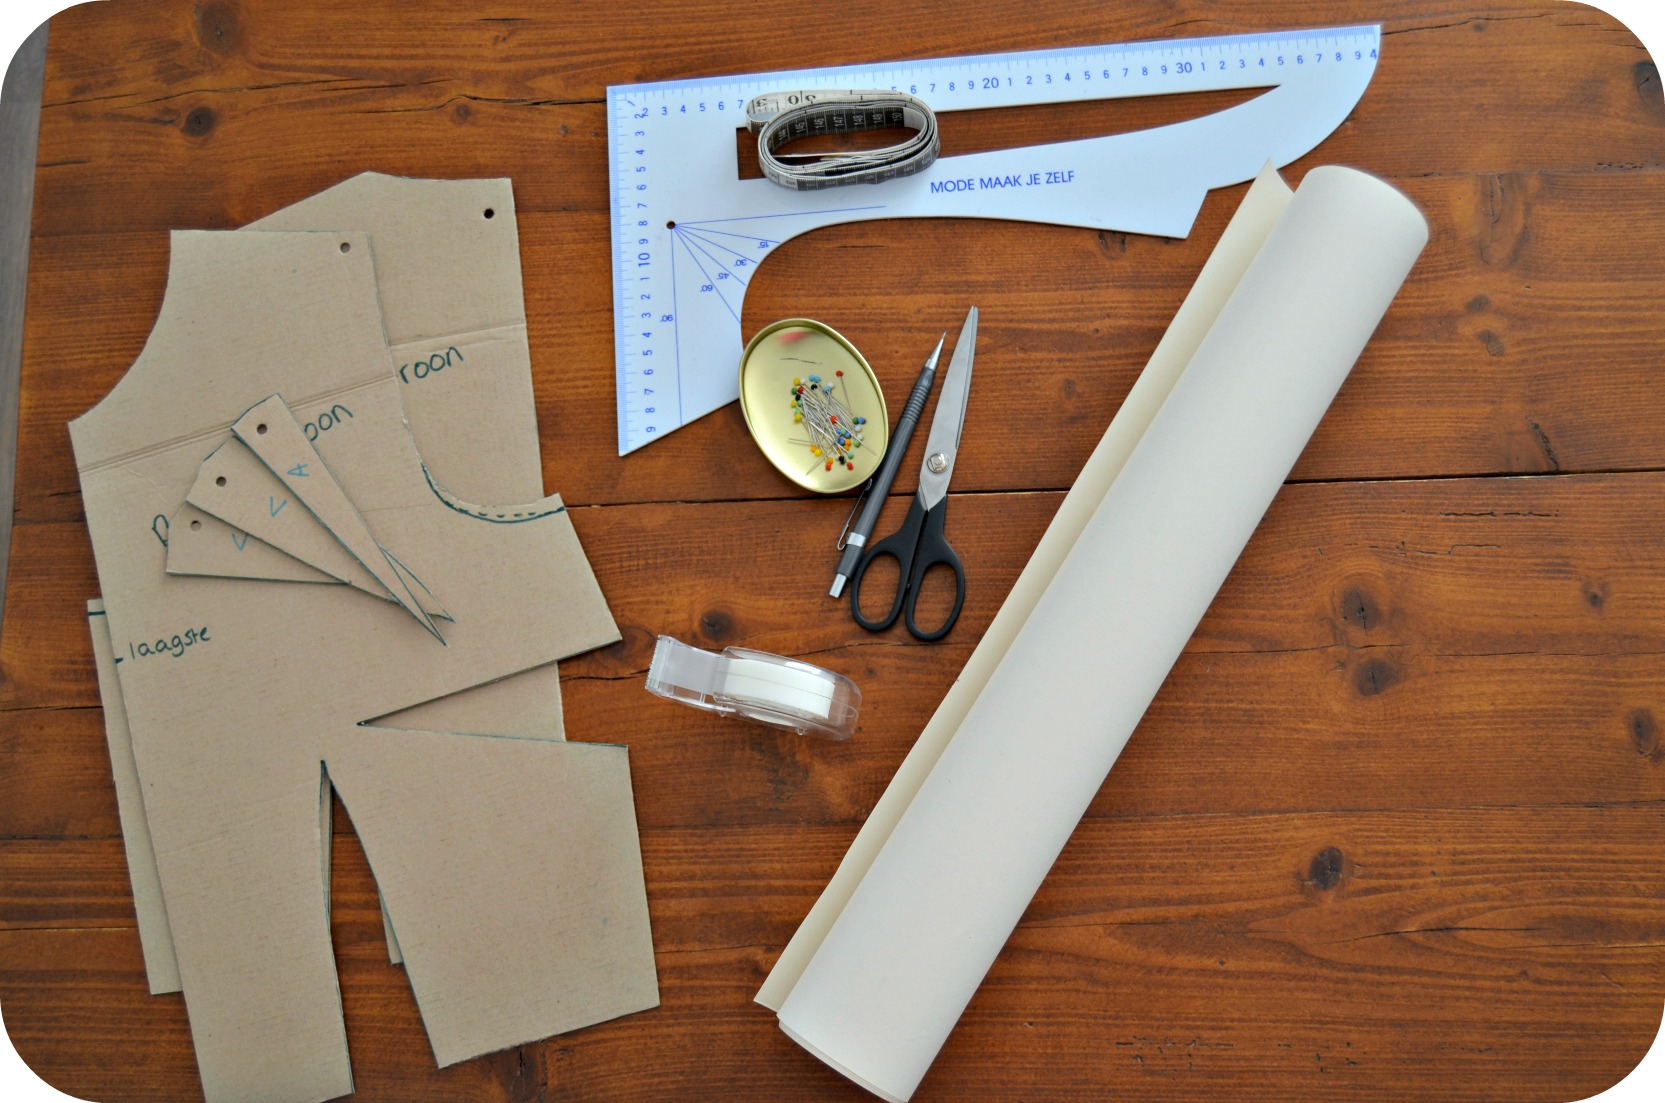
1. Een goed passend basispatroon voor een bovenlijfje zonder naadtoeslag
2. Een meetlint en een lineaal, bij voorkeur één met ‘curves’
3. Tekenpapier, ik gebruik hiervoor deze van de Ikea
4. Plakband, een potlood en een schaar
–
1. A well-fitting basic bodice pattern without seam allowance
2. A tape measure and a ruler, preferably one with curves
3. Paper, I use this one from Ikea
4. Sellotape, a pencil and scissors
–
Wat moet je opmeten? – What should you measure?

– Hoe laag wil je de halslijn?
– Hoe breed wil je de schouders?
– Hoe hoog wil je de schouderrimpels?
– Hoe hoog wil je de tailleband maken?
Bijvoorbeeld: mijn halslijn is 13 cm lager dan mijn basispatroon en de schouders zijn 3,5 cm smaller. En mijn schouderrimpels zitten 11 cm onder de schoudernaad.
Mijn tailleband is 7,5 cm hoog, gemeten op de figuurnaad in de taille, zodat de tailleband net onder de beugels van mijn BH stopt. Ik vind het zelf mooi dat de tailleband een beetje glooiend loopt, en dat ‘ie op de achterkant in het midden wat lager is dan aan de voorkant. Daarom heb ik mijn tailleband in het midden wat hoger gemaakt en bij de zijnaad wat lager. Voor is ‘ie in het midden 8 cm, achter in het midden 6,5 cm en bij de zijnaden 5,5.
–
-How low do you want your neckline to be?
– How wide do you want your shoulders to be?
– How high do you want the shoulder gathers to be?
– How high do you want your waistband to be?
For example: my neckline is 13 cm lower than the one on my basic pattern and the shoulders are 3,5 cm narrower. And my shoulder gathers are 11 cm lower than the soulder seam.
My waistband is 7,5 cm high at te bust dart so it ends just below the underwires of my bra. I wanted my waistband to have a little curve so I made it higher at center front/back and lower at the side seams. My waistband is 8 cm at centre front, 6,5 cm at centre back and 5,5 at the side seams.
–
Over naar het tekenen – On to the drawing
–
1. Teken je basispatroon over en knip het uit
1. Trace your basic pattern and cut it out
–
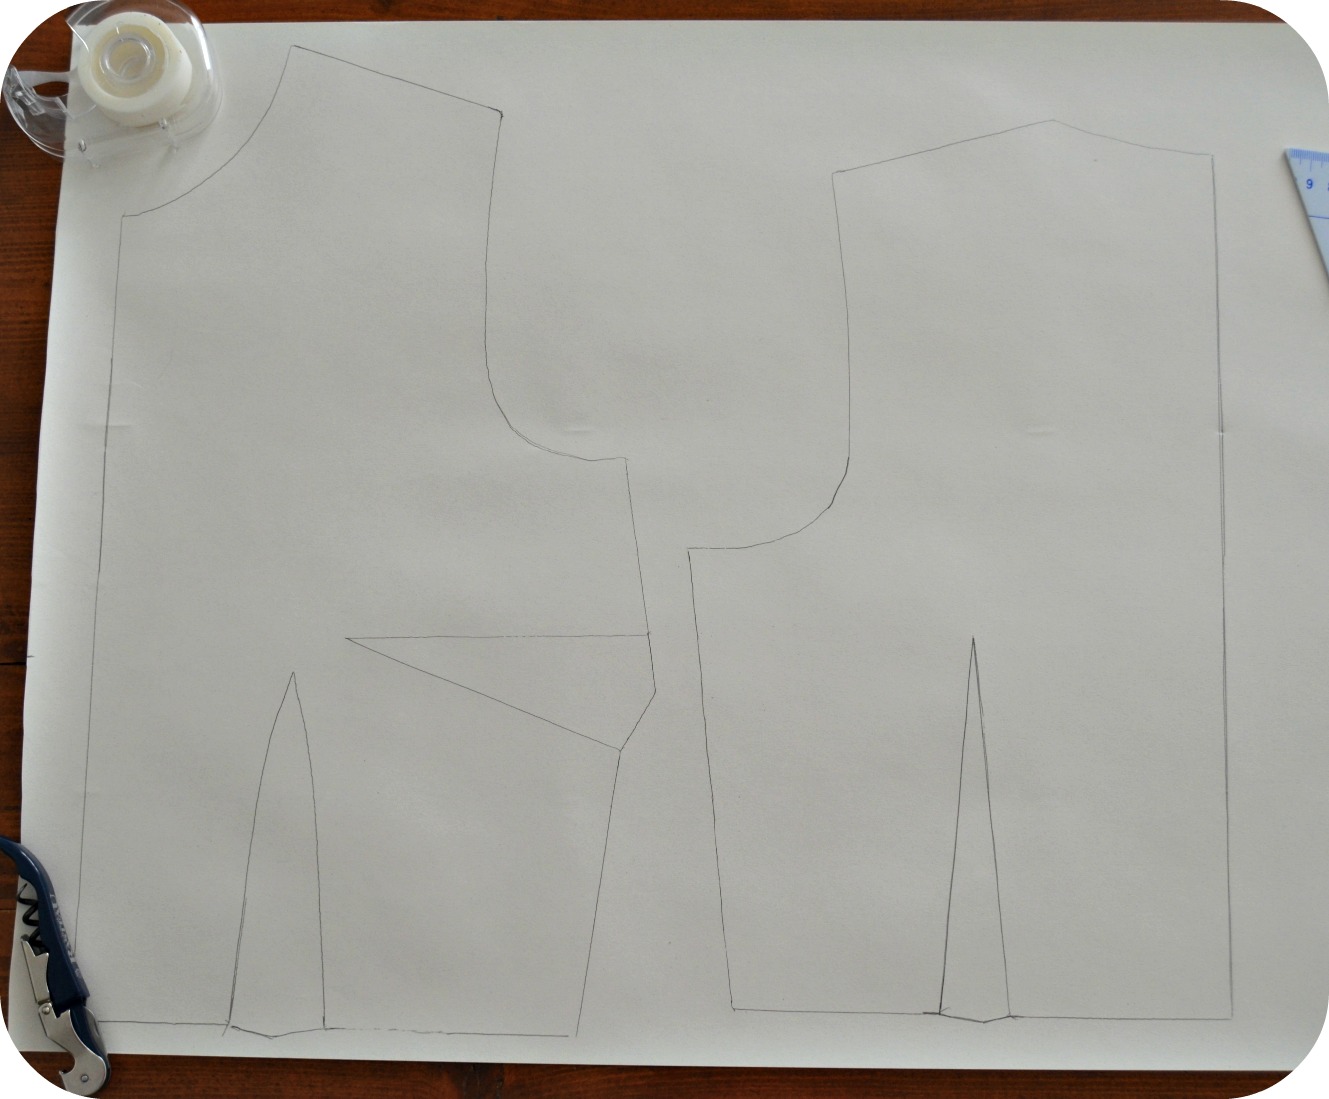
(mooie indruk maakt dat, een kurkentrekker als gewichtje)
(very classy, using a cork screw as pattern weight)
–
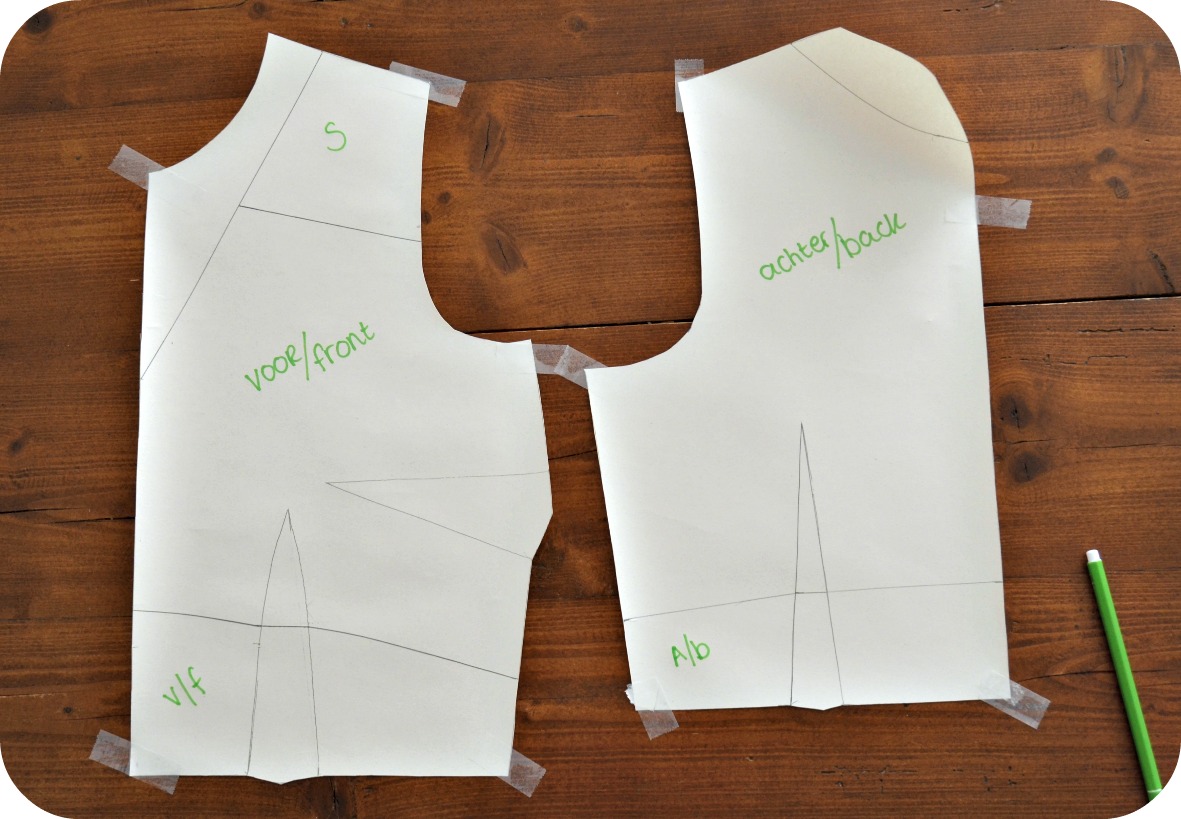
2. Verwerk de dingen die je opgemeten hebt in het patroon
2. Put the things you measured into the pattern
–
–
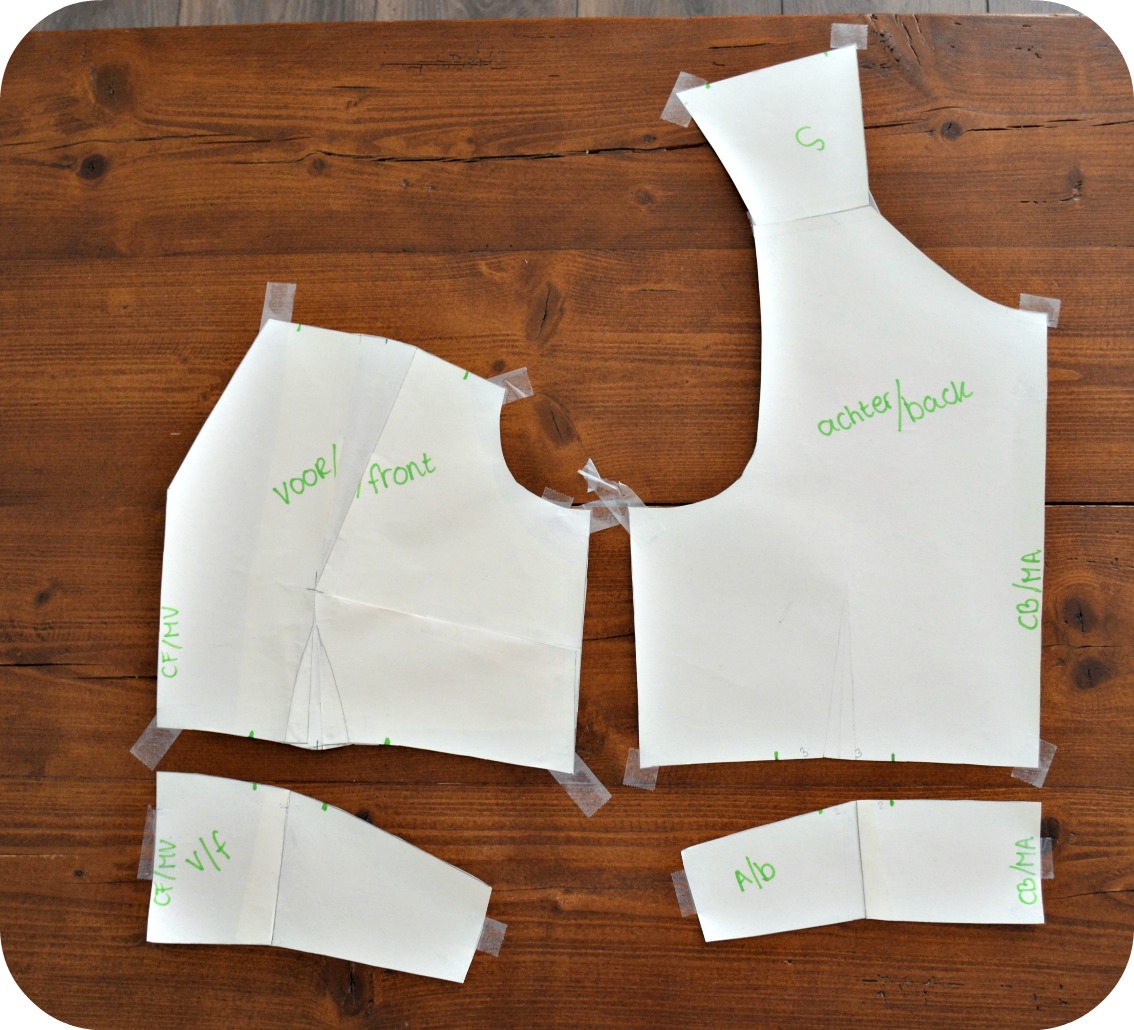
Je patroon zou er nu ongeveer zo uit moeten zien. Zorg ervoor dat je bij het tekenen van de ‘curve’ aan de bovenkant van de tailleband het binnenste van de figuurnaden niet meeneemt. Deze vouw je namelijk dicht bij het afknippen.
Your pattern should now look something like this. Make sure not to include the ‘inside’ of the darts in the waistband curve because you have to fold them closed when you cut the waistband off.
–
3. Knip de nieuwe hals- en schouderlijn.
3. Cut the new neck- and shoulderline.
Hier hoeft denk ik geen plaatje bij 🙂
I don’t think this one requires a photo 🙂
–
Achterlijfje / Bodice back
–
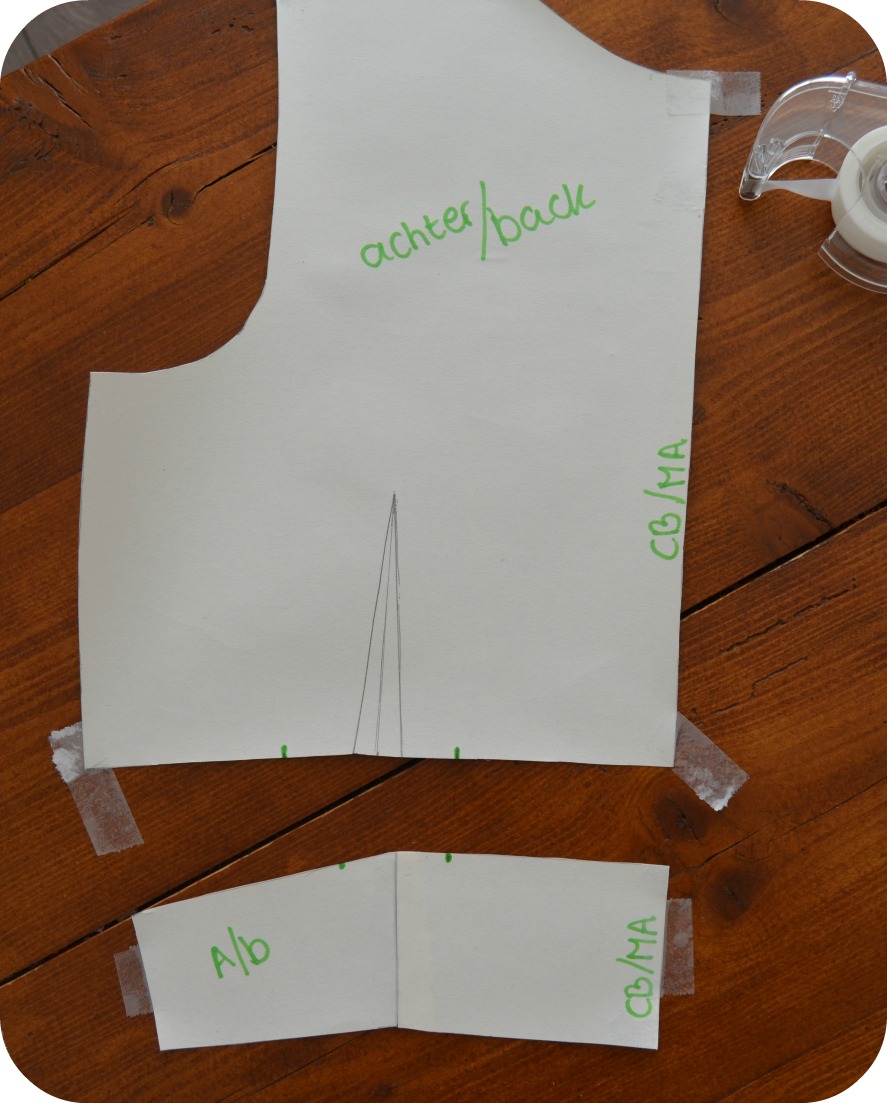
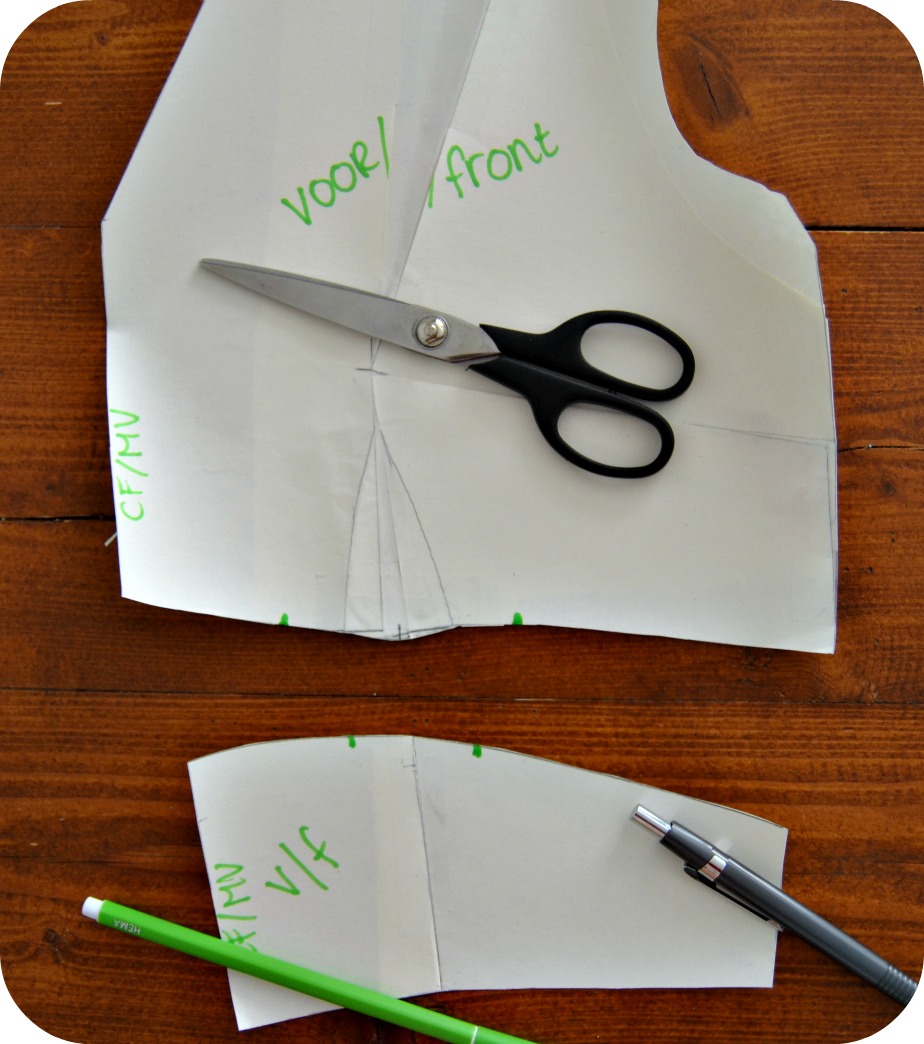
4. Knip de tailleband los en markeer de rimpelstukken
4. Cut the waistband off and mark the gathering parts
–
Vouw de figuurnaad dicht en doe er op de tailleband een plakbandje op zodat ‘ie blijft zitten. Knip zo de tailleband eraf. Het is verstandig om op de tailleband te zetten welke kant middenachter is, zo raak je later niet in de war. Meet op het bovenlijfje aan beide kanten van de figuurnaad 2 cm af en zet daar een markering voor de rimpels (de groene streepjes). Meet de afstand van middenachter en zijnaad naar de markeringen en neem die over op de tailleband. Gum de figuurnaad uit.
–
Fold out the waist dart and use the sellotape to keep it closed at the waist band. Cut off the waistband. Now mark which side the center back is so you won’t get confused later. On the bodice, measure 2 cm on both sides of the waist dart and mark. These are your markings for the gathering (the green stripes). Measure the distance between the markings and the center back and side seams, and but markings at the same distance on the waist band. Erase the waist dart.
–
5. Verplaats de schoudernaad (optioneel)
5. Move the shoulder seam (option)
–

–
Knip bij de voorkant van het bovenlijfje het stuk boven waar de schouderrimpels komen af en plak de schoudernaad aan elkaar. Dit hoeft niet, en kan ook alleen als je schoudernaad recht is. Ik heb het wel gedaan, want het betekent ook weer een naad minder te naaien en ik ben nou eenmaal een beetje lui aangelegd 🙂
–
Cut off the part of the front bodice above the line off the shoulder gathers and tape the shoulder seam closed. This is not really neccesary but I dit it because it eliminates an extra seam, and I’m just lazy like that 🙂
–
Voorkant bovenlijfje / Bodice front
–
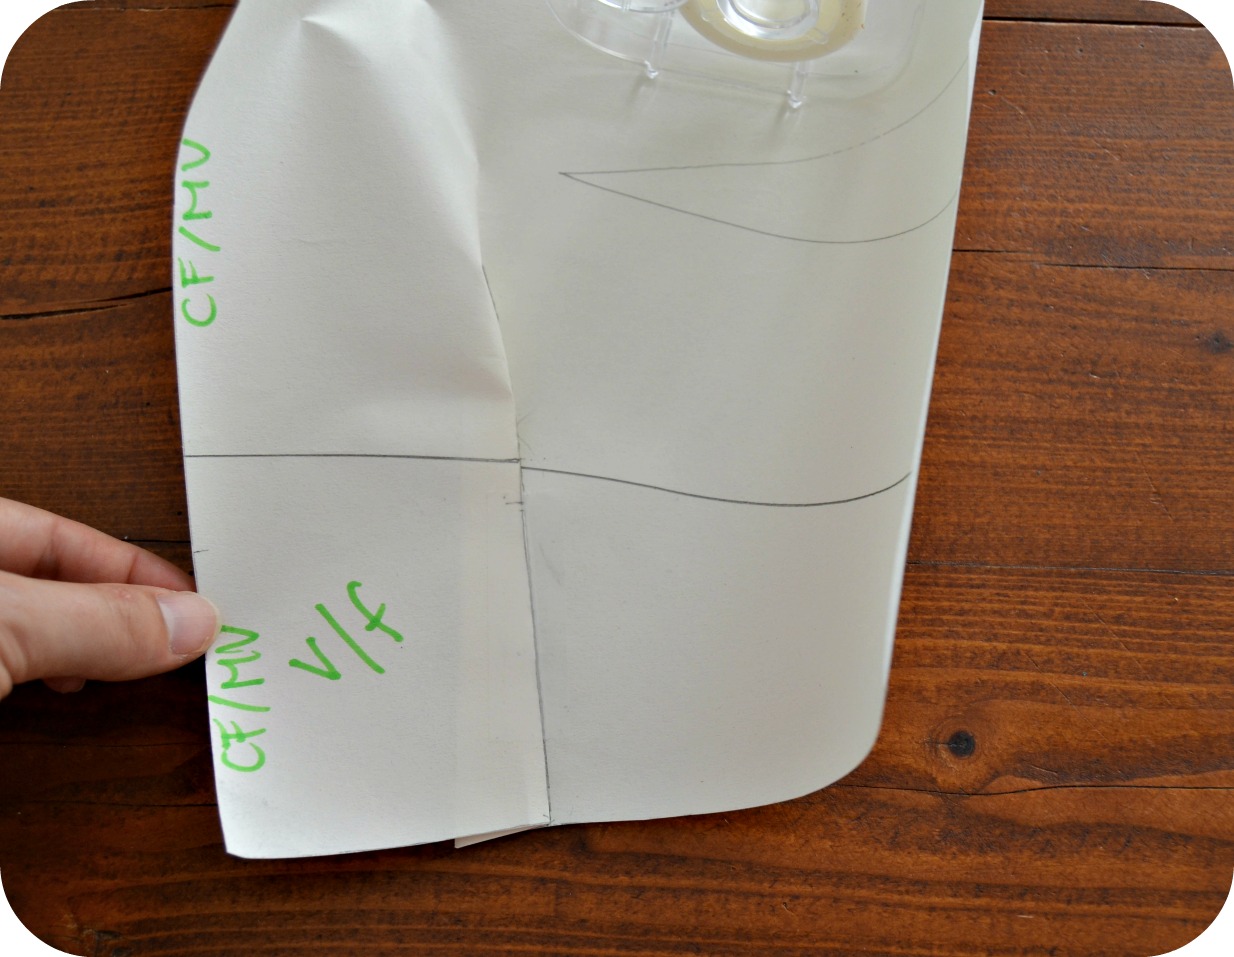
6. Knip de tailleband los
6. Cut the waistband off
–
–
Net als aan de achterkant, vouw de figuurnaad bij de taille dicht en plak hem vast op de tailleband. Knip de tailleband los. Markeer middenvoor.
Just like the back: fold out the waist dart and sellotape it closed on the waistband. Cut the waistband off. Mark center front.
–
7. Verplaats de figuurnaad aan de zijkant naar de schouder en een beetje naar die in de taille
7. Move the side dart to the shoulder and a bit to the waist.
–
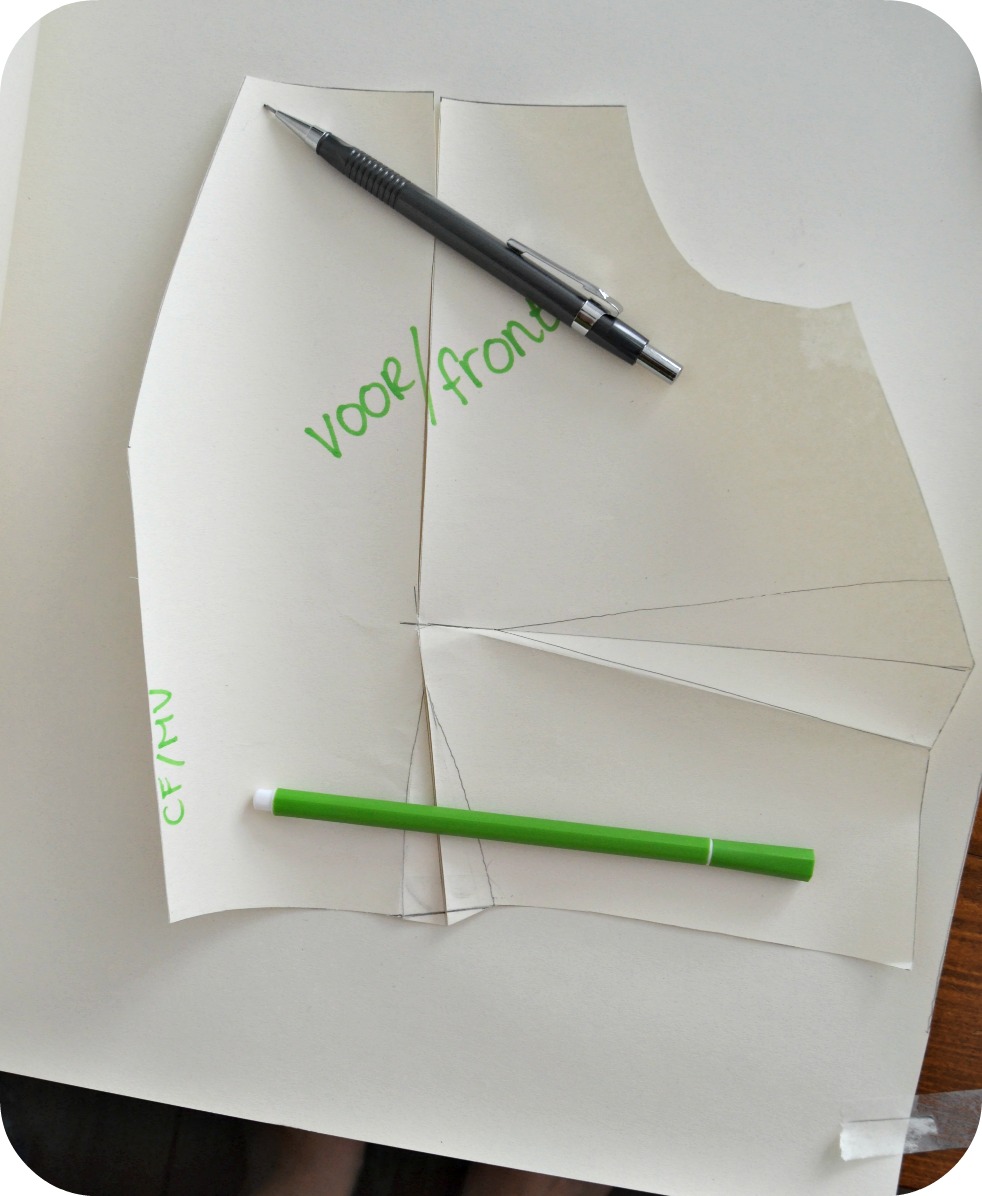
Dit doe je in twee stappen. Eerst markeer je het volste gedeelte van de buste. Dat doe je door een lijn in het midden van de beide figuurnaden te tekenen en die een stukje door te trekken. Waar ze elkaar kruisen zit het volste punt. Vanuit dit punt trek je een lijn naar het midden van de nieuwe schoudernaad.
This takes two steps. First, you need to mark the bust apex. You do so by drawing a line at the center of both bust darts and extending them. Where they cross each other is your bust apex. Draw a line from the bust apex to the middle of the new shoulder seam.
–
–
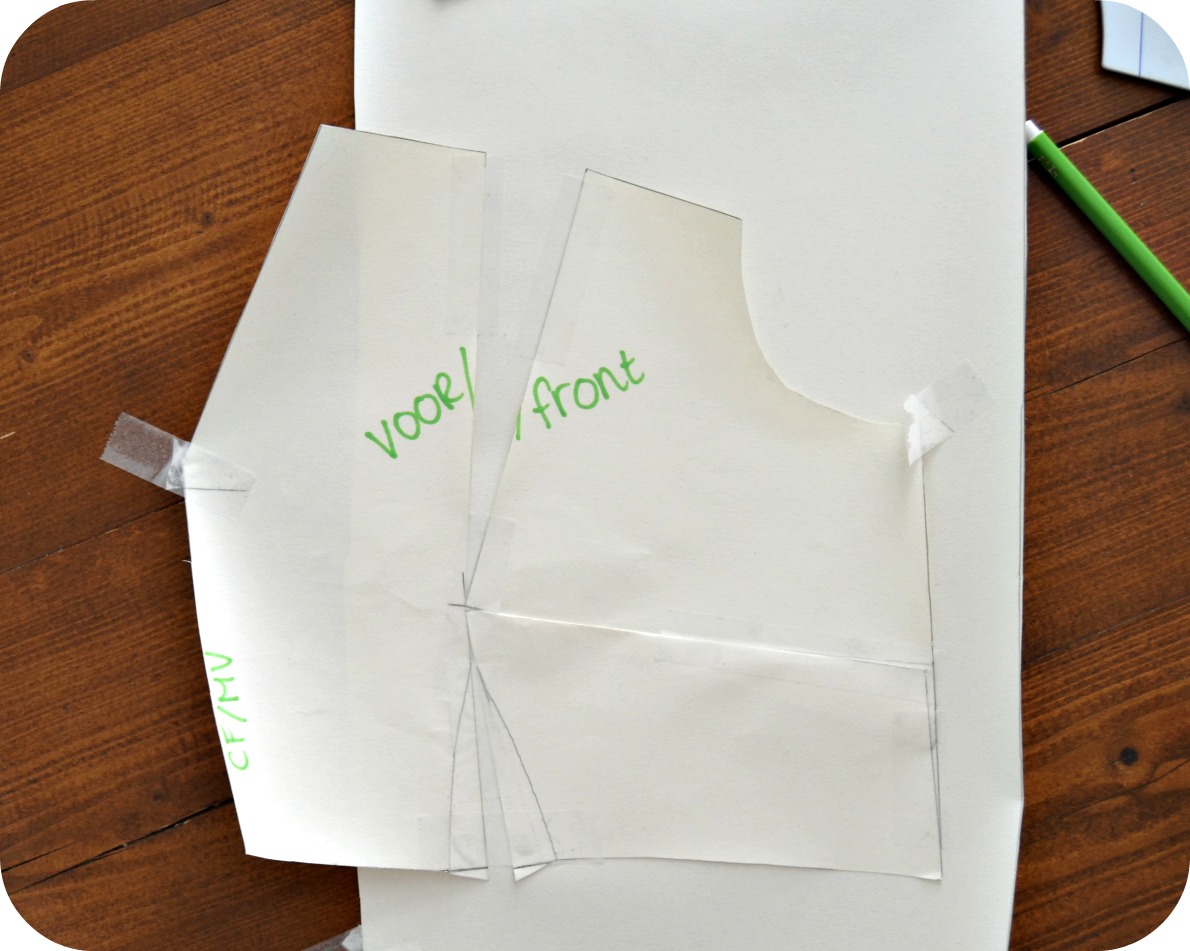
Knip de pas getekende lijn door tot één of twee mm voor het volste punt van de buste. Knip ook de lijn midden door de onderste figuurnaad door tot één of twee mm voor het volste punt. Vouw nu de figuurnaad aan de zijkant dicht, met het gevouwde stuk naar beneden. Hierdoor trek je de net doorgeknipte lijnen open. Plak je patroondeel op een nieuw stuk papier. Zorg ervoor dat de onderste figuurnaad ongeveer cm wijder wordt en verwerk de rest van de wijdte in de nieuwe figuurnaad op de schouder. Plak vast vast met plakband. Trek met de lineaal een nieuwe rechte zijnaad.
Cut through the line you drew and stop at one or two mm from the bust apex. Do the same for the line through the waist dart. Now fold the bust dart closed and make sure the folded piece goes downwards. By doing this, the lines you just cut will open up. Tape your pattern piece to a new piece of paper. Open up the line through the waist dart by about a cm and tranfer the rest of the width in the new shoulder dart. Tape in place. Use the ruler to true the side dart.
–
–
Vouw de nieuwe figuurnaden dicht met het gevouwde deel richting middenvoor en markeer waar het uiteinde van de naad zit. Knip het overtollige papier weg. Gum de figuurnaad bij de taille uit.
Fold the new darts closed with the folded part towards centre front and mark where the seam at the end of the dart is. Cut off the excess paper. Erase the waist dart.
–

–
8. Markeer waar de rimpels komen
8. Mark the gathers
–

–
Bij de schouders: teken zowel op het voor- als op het achterlijfje een streepje op 2 cm van het armsgat en de halslijn zoals je hier boven ziet. De rimpels komen tussen de streepjes op het voorpand.
Draw a marking on both the front and back bodice at 2 cm from the armscye and the neckline, like you see on the photo above. The gathers will be between the markings on the bodice.
–
–
Op de voorkant van het bovenlijfje teken je aan beide kanten een streepje op 2 cm van de lijnen van de figuurnaad. Meet de afstand van middenvoor tot het ene streepje en van de zijnaad tot het andere streepje. Zet op dezelfde afstanden een streepje op de tailleband.
Make a mark at 2 cm from the legs of the waist dart. Measure the distance from center front to the marking and from the other marking to the side seam. Make a mark at the same distances on the front waist band.-
–
Klaar! – Done!
–
–
Je patroon ziet er nu als het goed is zo uit. Voor de mooiigheid kan je het nog een keer overtrekken zodat je niet alle vouwen in je patroon hebt. Je kan dan, als je het handig vindt, ook de gewenste naadtoeslag toevoegen, en welke patroondelen je op de stofvouw wilt hebben en waar je de rits wilt plaatsen. Ik heb bijvoorbeeld mijn voorpand op de stofvouw geknipt, maar als ik dit patroon nogmaals maak doe ik dat niet meer. De punt van de v-hals wordt dan veel strakker.
Your pattern should look like this by now. To make it look prettier you can trace it on a new piece of paper, to get rid of all the folds. You can also add your desired seam allowances and which pieces you want to cut on the fold, and where you want your zipper to go. For example, I cut my bodice front on the fold but won’t do that again next time, because the point of the v-neck will look better if there is a center front seam.
–
En de rok dan? – And what about the skirt?
–
Voor mijn ‘connecting the dots’-jurk gebruikte ik een halve cirkelrok. Heel simpel: voer in deze app dezelfde taillewijdte in als die van je bovenlijfje en je krijgt precies de afmetingen van je rokpatroon! Ik knipte nog wel naadtoeslag aan de zijnaden en de middenachternaad, en zo paste het precies.
For my ‘connecting the dots’-dress I used a half cirkle skirt. Very easy: just use the measurement of the bodice as waist measurement in this app and it will tell you how big your pattern should be! I did add seam allowances to the side and center back seam , and it fitted perfectly.
–

–
Dat was ‘m! Valt eigenlijk best mee toch? Is er iets niet duidelijk aan bovenstaande of heb je nog andere vragen, dan kun je die altijd in de comments stellen of een mailtje sturen naar inge (at) ingemaakt.com.
That’s all! Not that hard is it? If something is not clear or if you have any other questions please don’t hesitate to ask, either in the comments or by e-mail: inge (at) ingemaakt.com.


