Adventures in bra making part 2

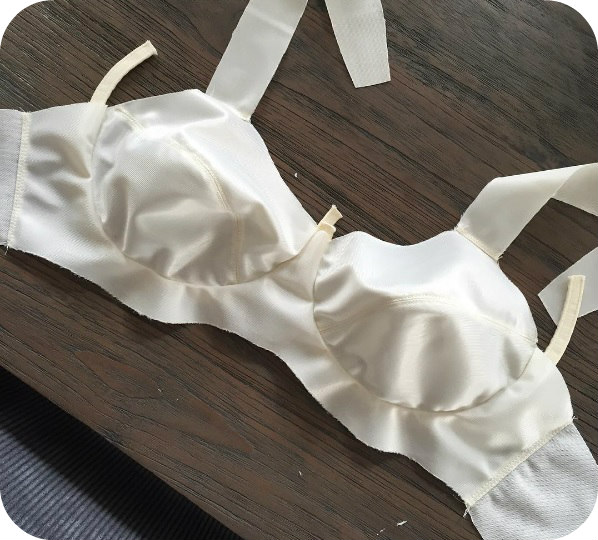
Na het succes met de DL01 besloot ik om de Maya bra van AFI nogmaals te proberen, maar dit keer in dezelfde maat als de DL01: 75C. Ik had nog een stuk zwarte badpakstof liggen, het leek me dat dat ook best geschikt is voor een beha. Ook had ik nog een stuk witte rekbare kant liggen, wat er mooi mee combineerde.

After the succesful DL01 I decided to give AFI’s Maya bra another try, but this time in the same size I used for the DL01: 75C. I had some black swimsuit fabric and figured that would also be suitable for a bra. I also had some white stretch lace which would look nice with the black fabric.


-Maya bra 2


De ook hier niet afgewerkte beugelband geeft het al weg: ook deze past niet. Te klein dit keer. Vervelend, maar ook van dit exemplaar leerde ik weer: de band aanpassen voor het gebruik van kant.

The unfinished wire casing probably gives it away: this one doesn’t fit either: it’s too small. Annoying, but making this one did teach me a new skill: adjusting the band for a scalloped lace. So all is not lost.


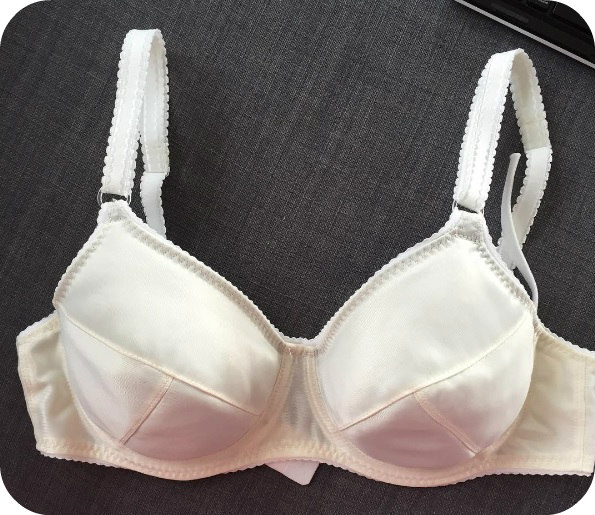
Vervolgens duurde het een paar weken voordat ik weer een beha maakte. Al dat werk en maar één draagbaar exemplaar, dat haalde de lol er wel een beetje vanaf. Vorige week waren we op vakantie in Engeland en daar kocht ik een stofje waarvan ik meteen wist dat ik er een beha van wilde maken, en dat deed het vuur weer oplaaien. Ik besloot om nogmaals een Makebra patroon te gebruiken, dit keer de DL03.

Then there was no bra making for a few weeks. Al that work and only one wearable bra, no fun in that. Last week we took a trip to the UK and I bought a fabric that I immediately imagined as a bra, and that reignited the bra making fire. I decided to use another Makebra pattern, the DL03.


Makebra DL03


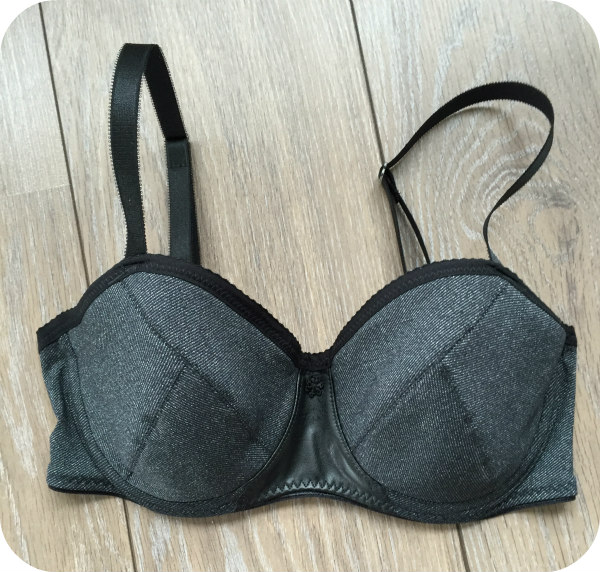
Ik vind ‘m zó gaaf geworden, met dat stukje nepleer tussen de cups. De beugelband moest ik aan de binnenkant met de hand vastzetten want mijn naaimachine wou die absoluut niet voor de tweede keer doorstikken, maar dat had ik er voor over 🙂 De pasvorm is ook erg goed, en hij geeft een mooie ronde vorm. Ik gebruikte de band van de DL01 omdat ik die al aangepast had, en de vorm van de cups hetzelfde is.

Overigens is deze beha gevoerd met padding en tussen de padding en de stof van de cups zit ook nog een laagje fiberfill. Dat deed ik omdat mijn andere, gekochte beha’s allemaal een voorgevormde cup hebben. Dat geeft een bepaalde vorm en op die vorm is mijn basispatroon voor jurken getekend. Al mijn jurken zijn dus voor die vorm gemaakt. Omdat ik mijn zelfgemaakte beha’s  graag aan wil kunnen met mijn zelfgemaakte jurken zonder dat de figuurnaden ineens op rare plekken zitten, probeer ik zo goed mogelijk de vorm van mijn gekochte beha’s na te maken.

I think this one looks really cool, with the little pleather patch at the bridge. As my machine just wouldn’t do the second row of topstitching there I had to sew the wire channel to the inside of the bridge by hand. I love how this bra fits. It gives a nice rounded shape. I used the band pattern of the DL01 since that one was already adjusted for fit and the shape of the cups in the band is the same.

This bra is lined with cut-and-sew foam and between the foam and the cup fabric there is a layer of fiberfill. I did this because my store-bought bras have pre formed cups and they have a certain shape. My basic dress bodice is drafted for that shape, and all of my dresses are fitted on that shape. I want to be able to wear my handmade bras with my handmade dresses without the darts looking al weird, so I’m trying to recreate the shape of my store-bought bras.

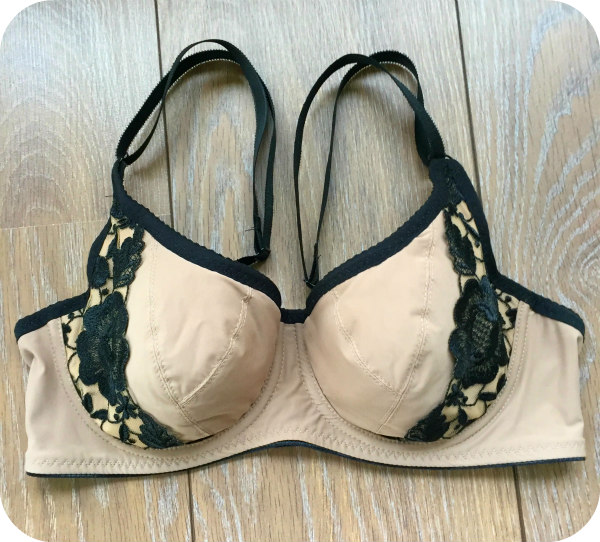
Ja, toen had ik de smaak weer te pakken en kwam er nog eentje:

So I was on a roll and made another one:


Makebra DL03 rood


Dit keer met het nepleer in de cups. De beugels die ik heb waren aan de korte kant voor dit patroon (gelukkig had ik nog een langer paar voor het grijze exemplaar) en daarom verlaagde ik de middenvoor een centimeter. Ook knipte ik aan de bovenkant naadtoeslag zodat ik het elastiek kon omslaan en doorstikken in plaats van omvouwelastiek te gebruiken. Dat ziet er net een beetje chiquer uit. Ik heb de bovenkant van de ene cup wel een beetje opgerekt bij het stikken van het elastiek maar dat zie je gelukkig amper als ik ‘m draag.

This time with the pleather in the cups. The wires I had were a tad short for this pattern (fortunately I had one longer pair for the grey version) and so I lowered the center front by a centimetre. This time I also added seam allowance to the upper side of the band and the cup so I could use picot elastic instead of fold over. I think it looks better. I did stretch one cup a bit as I sewed on the elastic but that’s hardly visible when I wear it.


Dus. Nu heb ik twee beha’s die goed passen en lekker zitten, en een donkerbruin vermoeden dat er nog meer gaan volgen… Al met al was het even een lastige start maar ik ben blij dat ik weer wat nieuws heb geleerd. Dat deed me wel denken aan wat er allemaal nog te leren valt in het naaien. Ik zou bijvoorbeeld nog wel eens willen leren hoe je het perfecte colbertje maakt. Niet dat ik vaak colberts draag, maar op één of andere manier ben ik ervan overtuigd dat dat verandert zodra ik de perfecte heb gemaakt. Wat zou jij nog wel willen leren, qua naaien?

So, now I have two bras that fit well and are comfortable. I have a sneaking suspicion more will follow… It was a bit of a difficult start but I’m happy I learned a new skill. It did got me thinking about what else there is to learn when it comes to sewing. For example, I would like to learn how to make the perfect suit jacket. Not that I wear those, like ever, but somehow I’m sure I will once I made the perfect one. What would you want to learn when it comes to sewing?


oops...

oops…


Adventures in bra making

Na 5 jaar naaien ben ik min of meer op het punt beland dat ik niks meer écht nodig heb qua kleding. Tijd om iets nieuws te proberen dus. Een Craftsy-sale verleidde mij tot het aanschaffen van Beverly Johnson’s cursus over beha’s maken. Beha’s vinden die goed passen en lekker zitten vind ik best lastig, omdat mijn ‘dames’ wel aan de brede kant zijn maar niet zo ‘diep’. Zelf beha’s kunnen maken zou dus wel van pas komen.

After 5 years of sewing, when it comes to clothes, there’s nothing I really need to make. Time to try someting new! A Craftsy sale lured me into buying Beverly Johnson’s bra making class. Finding a well-fitting and comfortable bra is not that easy because of the shape of the ladies: they’re quite wide but also a bit shallow. So bra making would be a usefull skill.

En dan begin je dus opeens weer helemaal als beginner. Ik had materiaal nodig, maar wat precies en wat nou het goede spul was, géén idee. Daarom kocht ik de speciaal samengestelde cursus kit. Wel hoge verzendkosten, maar ja, het is een investeeering, zo vertelde ik mezelf.

And suddenly I was a complete novice again. I needed materials, but how to find out which ones were the right ones? I had no clue. So I decided to buy the kit that’s specially made for the class. Shipping was a bit expensive but hey, it’s an investment right? At least that’s what I told myself.


pin-up girls classic 1e poging

      Baby’s first bra  😀


En zo ging ik aan de slag met het patroon dat bij het pakket zat: de Classic van Pin-up Girls. Dit was niet helemaal het type beha dat ik in gedachte had, ik heb liever een gevoerde beha. Niet iedereen hoeft te zien dat ik het koud heb if you know what I mean. Maar goed, je moet ergens mee beginnen en als het patroon éénmaal past kun je natuurlijk altijd nog aan de slag met padding etc.

And so it began, I started working with the Pin-up Girls Classic. Not exactly the type of bra I want to make, I prefer a padded bra. No-one needs to see it when I’m cold, if you know what I mean. But I figured that once the pattern would fit I could use it with padding or cut-and-sew foam.


schouderband

Jep, een echte beginner. Dit zou een rechte schouderband moeten zijn..

Yup, a real novice. This is supposed to be a straight shoulder strap…


cup aanpassing

      Scary pinning…


Net als bij het kopen van beha’s had ik wat gedonder met het vinden van de juiste maat. Volgens de maattabel moest ik een 34C maken. Die was te klein. Toen maakte ik een 34D. Die was veels te groot. Uiteindelijk maakte ik een 36C en verkortte de band. De band en de beugel pasten, maar de cup niet, die was nog te groot. Ik speldde het overschot eruit (eng!) en paste het patroon aan. Vervolgens maakte ik een exemplaar met een vulling van fiberfill. Ik las op de blog van Merckwaerdigh dat dat kon, en aangezien fiberfill niet zoveel kost leek het me de moeite wel waard om dat uit te proberen.

Just like in the shops it took some trial and error to find the right size. The size chart told me to make a 34C, which was too small. I made the 34D. Way too big. Then I made the 36C but changed the lenght of the band to the length of the 34 band. Then the band and the wires fit, but the cup was still too big. I pinned out the excess (scary!) and adjusted the pattern. I used this adjusted pattern to make a bra with fiberfill padding. I read on the Merckwaerdigh blog that this could be used instead of cut-and-sew foam, and since fiberfill is pretty cheap I thought it was worth a try.


Pin-up girls classic


De fiberfill was min of meer een succes, maar het patroon nog steeds niet. Het leek vanaf de zijkant wel alsof er twee driehoekjes op mijn borstkas geplakt zaten. Ik was er wel klaar mee en besloot een ander patroon te proberen: de gratis Maya bra van AFI. Ik maakte een 75D, de maat die ik ook in de winkel koop. De maat van de cup checkte ik door de papieren patroondelen aan elkaar te plakken. Het bleek dat dezelfde aanpassing als in de Classic nodig was. Vervolgens maakte ik een proefje van een restje rekbare stof, dit keer met ‘echte’ padding.

The fiberfill as padding was ok, but the shape of the pattern stil wasn’t. From the side it looked like there were two triangles stuck to my chest. By that time I got quite cranky and decided to try another pattern: AFI’s free Maya bra. I made the 75D, the size I also buy at the store. I taped the paper pattern pieces together to check the cup size and did the same adjustment as on the Classic pattern. The I used a remnant of stretch fabric to make a trial version, with cut-and-sew foam this time.


maya bra


Die paste op zich, maar gaf niet veel steun en lift (daarom zit de beugelband ook nog los, hij is niet afgemaakt). Pffft, ik had op dat moment helemaal geen zin meer om verder te gaan. Na een chagerijnig rondje Googlen kwam ik bij de patronen van Makebra. Die zijn speciaal gemaakt voor padding en zagen eruit alsof ze de vorm hadden waar ik naar zocht. Ik besloot om nog één keer te proberen voor ik de handdoek in de ring gooide.

It fit, but it wasn’t very supportive and lifting (the wire channel is still loose because I didn’t finish it). Ugh! I kind of lost steam there. After an hour or so of crankily Google-ing I stumbled upon Makebra patterns. They are especially made to use with cut-and-sew foam and looked like they give the shape I was after. I decided to try one of them before throwing in the towel.


Makebra DL01


Dit is de DL01 in maat 75C, met een voering van fiberfill. De band is ietsje te lang maar voor de rest past ‘ie goed. Hij geeft ook een mooie vorm. Eindelijk! Ik was zo blij (en trots, haha)! Je ziet bij de cups dat de stof nog wat hobbelt, ik had hem iets strakker over de fiberfill moeten trekken. Deze beha heb ik een paar keer gedragen en hij zit op zich heel comfortabel, maar doordat de voering dit ik voor de cups heb gebruikt kleine gaatjes heeft prikt de fiberfill er wat doorheen. En dat jeukt! Weer een les geleerd, haha!

This is DL01 in 75C, with fiberfill padding. The band is slightly too long but other than that the fit is good, and it has a nice round shape. Finally! I was so happy (and proud, haha)! You can see that the fabric is in the cups is a bit wobbly, I should have pulled it tighter over the fiberfill. I’ve worn this bra a few times and it’s quite comfortable, but the lining in the cups is sheer and the fiberfill pokes through, which itches! Another lesson learned I guess, haha!

Dit was deel 1 van mijn beha-maak-avonturen. Met een happy end, gelukkig. In de volgende post het vervolg, anders wordt het wel een erg lang verhaal 🙂

So this was part 1 of my adventures in bra making land. With a happy ending, fortunately. I don’t want to make this post too long so the sequel is in the next post 🙂