
Joehoe, het is weer mooi weer en we hebben de hele zomer nog voor ons. Dé tijd voor jurkjes en rokjes. Heerlijk vooruitzicht toch? Voor mij, en met mij nog veel meer vrouwen, zit er wel een klein nadeeltje aan: schurende bovenbenen. Als je er last van hebt, dan weet je hoe pijnlijk dat kan zijn. Om ze te voorkomen droeg ik al een aantal jaar lange onderbroeken van Sloggi. En alhoewel dat een heel stuk beter was dan korte leggings of nog erger: afgeknipte panties (zweten!!!), vond ik ze best duur en ze tekenen ook een beetje aan de bovenkant.
Yay, the weather has turned nice again and we have the whole summer ahead of us. Finally time to wear those summer dresses and skirts! But for me, and a lot of other women, it has a slight downside: thigh chafing. If you have this, you know how painful it can be. To prevent it I have been wearing store-bought long underpants. While they are way better than short leggings or, even worse, cut off tights (sweaty!!) they are quite expensive and dig in a bit on top.
Toen ontdekte ik de Hilda bike shorts van Ohhh Lulu.
Cue the Hilda bike shorts by Ohhh Lulu.

(image from Craftsy)
Toen ik hem wilde kopen ontdekte ik dat ik het patroon al eerder had gekocht. Dat zit kennelijk in de familie, want dat had mijn oma regelmatig met schoenen 🙂
When I went to buy them, I discovered that I already bought the pattern. Apparently this runs in the family, my grandma had that happen with shoes on multiple occasions 🙂

Het is een echt onderbroek-patroon, compleet met kruisje. Dat in elkaar zetten was even een klusje. Het kruisje heeft de vorm van een spekje, en je naait het eerst in het ene been vast om vervolgens de andere kant tegelijk met de kruisnaad te naaien. Ik deed dat op mijn lockmachine, en de naadtoeslag van een centimeter maakte dat ingewikkelder dan nodig. Daarom knipte ik een halve centimeter van de naadtoeslag af, zodat de breedte van een lockstiksel overbleef. Op die manier kon ik het precies langs het mes van mijn machine laten lopen. Dat werkte een stuk makkelijker!
It’s a real underwear pattern, complete with a crotch gusset. It’s a bit of a hassle to get that on. It has a diamond shape, and you sew it to one leg first and then sew the other side at the same time as the crotch seam. The pattern has a one centimetre seam allowance and on my serger that made it more fiddly than needed. I cut down the seam allowance to the width of a serged seam. That way I could use my serger blade as a guide, which was way easier!

Daar zie je het kruisje. Als stof gebruikte ik katoenen tricot. Viscose kan ook, maar dat vind ik toch wat zweteriger dan katoen. Het patroon voorziet in een bovenkant van omvouwelastiek maar mijn voorkeur gaat uit naar een mooi kantrandje. Dat tekent minder en ik vind het makkelijker om aan te zetten.
Here you can see the crotch gusset. The fabric is a cotton jersey. Viscose jersey would also work but I prefer cotton. The pattern tells you to finish the top of the shorts with fold over elastic but I prefer a nice wide stretch lace. It doesn’t show under clothes and I find it easier to apply.
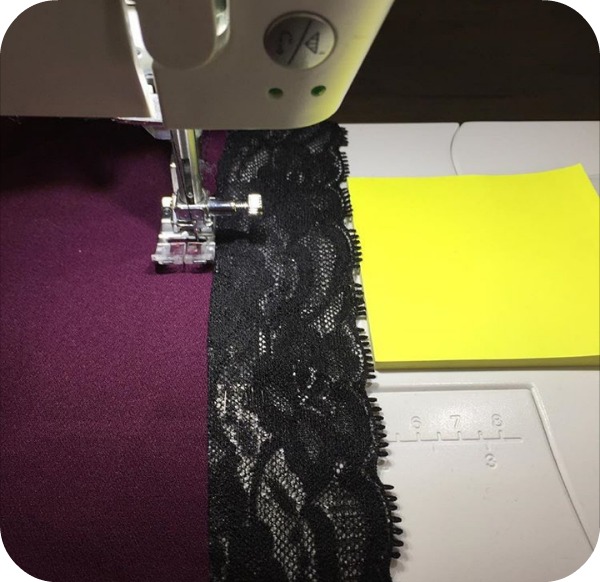
Dit is hoe ik dat doe: met een blokje post-its om de afstand te bepalen. Het kant ligt met de goede kant naar beneden en de stof ook. Ik stik het vast met een zig-zag steek terwijl ik het kant een heel klein beetje uitrek. Om het zo netjes mogelijk te krijgen heb ik wel de volgorde een beetje veranderd, ik stik eerst de voorkruisnaad, doe dan het kant op de bovenkant en stik van de achterkruisnaad dicht. Door de vorm van het kruisje dat erin zit gaat dat heel makkelijk, en zo loopt het kantje mooi door aan de voorkant.
This is how I do that: with a stack of post-its as a guide. The lace is right side down and so is the fabric. It’s sewn with a zig-zag stitch and the lace is stretched slightly while sewing. To get a neat finish I changed the order of construction a bit. After sewing the front crotch seam I apply the lace and then sew the back crotch seam. Because of the shape of the crotch gusset that’s easy to do, and it gives a nice flat finish at the front.
Na de eerste twee versies (de blauwe en de groene hierboven) maakte ik het patroon iets kleiner. Als ik de maattabel volg dan zou ik een S taille en een L heup moeten maken, en dus koos ik voor een M. Die was in de taille iets te ruim en de pijpjes kropen wat omhoog. Uiteindelijk heb ik nu een patroon ergens tussen S en M in, en die past goed. Ik las in reviews van het patroon dat de taillehoogte wat aan de lage kant was, en ik wilde de pijpjes niet te kort, dus gebruikte ik de lengte en hoogte van de grootste maat. Dat was perfect.
After the first two versions (the blue and green ones above) I sized down a bit. According to the size chart I’m an S at the waist and L at the hips, so I chose to cut a size M. It was slightly big at the waist and the legs crawled up a bit. The adjusted pattern is now somewhere between S and M. In reviews I read that the rise was a bit short and I like the legs slightly long so I used the rise and leg length of the biggest size and it’s perfect.
En nu, in de naam van de naai-wetenschap, sta ik in mijn ̶h̶e̶m̶d̶ onderbroek op het internet.
And now, in the name of sewing science, here I am on the internet in my underwear.

Zo zitten ze dus. Ik ben er heel blij mee, ze zitten fijn, beter dan mijn oude Sloggi’s en het is een stuk goedkoper om ze zelf te maken! Inmiddels heb ik er 6 gemaakt, en ik draag ze bijna iedere dag. Ondanks het kantje vind ik ze niet heel charmant als onderbroek, maar het is altijd charmanter dan die rode plekken met bultjes 😀
So this is how they look. I’m really, really happy with those. They are much more comfortable than the store bought long underpants and it’s way cheaper to make them myself! I’ve already made 6 pairs and have been wearing them almost every day (not all 6 at the same time obviously). Despite the lace I don’t think they’re particularly charming but it does look better than that chafing rash 😀

Handwas en snel drogen in de zon: een teken van succes / A hand wash and drying quickly in the sunshine: sure sign of succes
Kortom: wat mij betreft een echte aanrader, dit patroon!
Long story short: I can’t recommend this pattern enough!

Thank you! I was just starting to wear my store-bought underwear like this, and they are starting to wear out. Now I have an option to make my own!
Yes! So good to have that opportunity 🙂
Ziet er goed uit! Ik ben zelf helemaal team bandelettes!
’s avonds even uitwassen en de volgende dag weer droog.
Ah yes, wat een goed idee. IK WIL DIT OOK! Want de zomer is fijn, maar blote bovenbenen… thnx!
Thanks for sharing this Inge, I need to buy this pattern and start sewing asap!
Haha. I love the name of this post.
Ze zien er echt heel mooi uit! Goed idee om zelf te maken, ik vind die van sloggi nooit lang genoeg. Met het huidige weer is het wel essentieel om iets te dragen!
Ik ga het patroon zeker ook proberen
Toevallig heb ik die vorige week ook 5 gemaakt! Ik had een patroon een keer gratis gedownload via craftsy en nu zou ik willen dat ik ze eerder gemaakt had! Echt heel handig.
Eh, het patroon he.. niet een :S
You’re so cute – chub rub:). Love it:). I had bought these things called bandalettes from the States to help – they’re kind of like the top of a stocking with lace on both sides, and they work quite well. But this looks way more comfy…. I actually have this pattern because when I started making my own underwear I bought loads of patterns (I too forget that I have them…..) but I had problems with the gusset and don’t have a serger. I will give them another try. Thanks for the inspiration!