I am Apollon jacket hack

Een tijdje terug kon ik niet zo goed slapen. Vaak komt dat omdat het dan een beetje druk is in mijn hoofd. Om mezelf af te leiden ga ik dan meestal even internetten op mijn telefoon. Op één of andere manier dacht ik dit keer dat het wel een goed idee zou zijn om online wat stoffen te bekijken. Newsflash: dat is het niet, haha. Het was echter wel het moment dat de inspiratie toesloeg. Ik zag deze stof en dacht meteen aan een soort bomberjasje-versie van de Apollon sweater. Anderhalve dag later stond de postbode op de stoep met de stof en boordstof.

A short while ago I couldn’t sleep. Usually this happens because of too many thoughts in my head, and I try to distract myself by browsing on my phone a bit. Somehow this time I thought it would be a good idea to look at some fabrics online. Newsflash: it is not, haha. It was however also the moment inspiration struck and I suddenly envisioned this fabric as a bomber jacket version of the Apollon sweater


Om dit jasje te krijgen deed ik de volgende patroonaanpassingen:

  • een middenvoornaad toevoegen voor de rits, met 1 cm naadtoeslag en de naad verstevigd met naadband ivm het gewicht van de rits
  • de halslijn een beetje verlagen ivm de lengte van de rits
  • de halsbies naar beide mv kanten taps toe laten lopen zodat deze in het voorpand ‘verdwijnt’
  • de tailleband in drie stukken gemaakt. De stukjes aan beide kanten van de rits zijn 7,5 cm breed.

Wat ik vergat maar een volgende keer wel ga doen:

  • dat mijn aangepaste patroon een naad middenachter heeft. Ik heb deze gewoon op de stofvouw geknipt en daardoor is het achterpand een cm te breed. Lekker slim 🙂


To get the pattern for this jacket I adjusted the pattern like this:

  • added a center front seam and gave it 1 cm seam allowance. I also interfaced this seam because of the weight of the zipper
  • loweder the neckline a bit to accommodate the length of the zipper
  • changed the shape of the neck band so it ‘disappears’ into the front bodice
  • chopped the waistband into 3 pieces. Those on both sides of the zipper are 7.5 cm wide.   

Things I forgot but plan to do next time:

  • remember that my adjusted sweater pattern has a center back seam. I cut it on the fold as it is, which added a cm of width to the back, which it doesn’t need. Very clever, ahem 🙂


Oh, en zakken toevoegen. Misschien een paspelzak of een kangaroezak. Want zeg nou zelf, op deze plek mist iets 😉

Oh, and add pockets. Single welt or kangaroo ones. Because as you can see, there is definately something missing here 😉


Ik denk dat dit een perfect vest is als extra ‘laagje’ voor als het net wel/niet warm genoeg is om zonder jas naar buiten te gaan. Daarvoor heb ik al een spijkerjasje maar bij een spijkerbroek vind ik dat dan weer niet zo mooi. Ik ben kennelijk niet hip genoeg voor double denim, haha.

I think this jacket is perfect as an extra layer for those days when it’s just/just not warm enough to go outside without a jacket. I have a jeans jacket for those days but I don’t like how it looks with jeans. Apparently I’m not hip enough for double denim, haha.


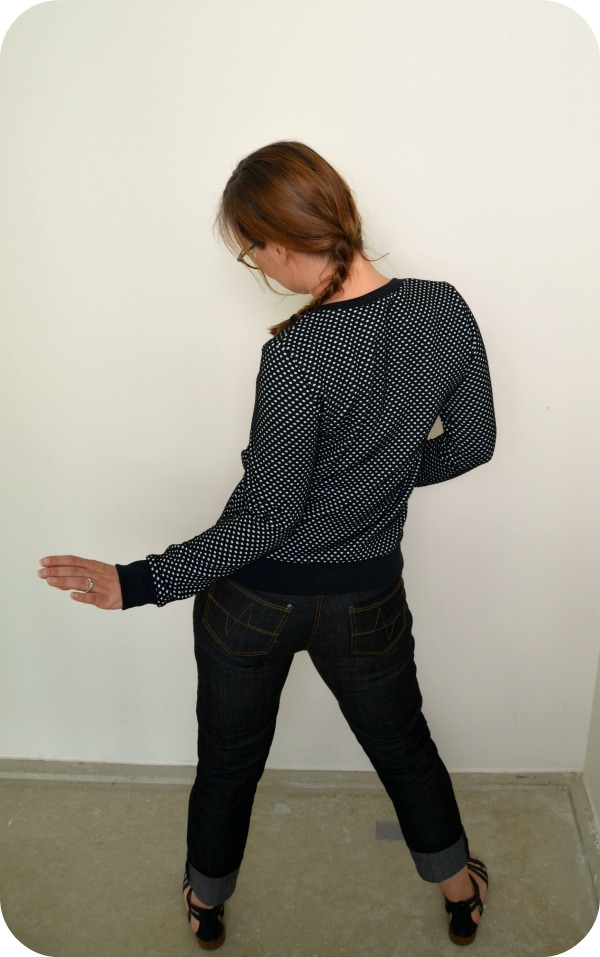
Lol met mezelf tijdens het foto’s maken 🙂

I had way too much fun while taking these pictures 🙂


De afwerking aan de binnenkant is niet super netjes. De bovenkant van de rits heb ik gewoon naar binnen gevouwen en de tailleband-stukjes zijn een  beetje uitgerekt. Niet echt dingen waar ik me druk over kan maken.

The finishing on the inside could be better. I just folded back the zipper tape at the top and the waistband pieces got stretched out slightly. I’m not at all bothered by this though.


Dat was hem dan, mijn jasje. Driewerf hoera voor knutselen met patronen!

Well there it is, my jacket. Hip hip hooray for pattern hacking!

Connecting the dots

Woohoo, meer stipjes! Toen ik dit patroon bedacht wist ik meteen dat ik een blauw gestippeld exemplaar wilde maken. Dit patroon is geïnspireerd door de swing dresses uit de jaren ’40. Al sinds de Sew for Victory sewalong van Rochelle wilde ik een dergelijke jurk maken. Maar toen was ik nog niet zo enthousiast aan het patroontekenen begonnen, en ik kon ook niet hét patroon vinden. Maar uiteindelijk kwam het dus goed 🙂

Woohoo, more dots! While making this pattern I immediately knew that I wanted to make it up in a blue, tiny dotted fabric.  The pattern is inspired by 40’s swing dresses. Ever since the Sew for Victory sewalong, hosted by Rochelle, I wanted to make a dress like this. At the time I wasn’t that into pattern drafting like I am now, and I also couldn’t find exactly the right pattern. But it all came together right now 🙂

BW3

Vandaag ging ik lunchen met mijn vader in de stad en daarna hebben we een kleine fotoshoot gedaan. Deze be-graffti-de muur staat bij mij in de buurt,  en is afgelopen juni gemaakt tijdens graffiti-festival Skrift.

Today my dad and I had lunch in town and afterwards we had a little photoshoot. This graffiti wall is near my house and is the result of a local graffiti festival held in june. 

BW12

Oké, terug naar de jurk. Hij ziet er heel anders uit dan het basispatroon met figuurnaden, maar het aanpassen is eigenlijk heel simpel. ik leerde hoe je figuurnaden omzet in rimpels in de Craftsy class ‘creative darts and seam lines’. Het enige wat ik moest doen om dit patroon te maken is de tailleband toevoegen, de figuurnaad aan de zijkant verplaatsen naar de schouder en vervolgens de figuurnaden omzetten in rimpels. Als je een tutorial wilt, dan maak ik die met plezier! (edit: die is inmiddels hier te vinden)

BW6

Ok, back to the dress. Despite it looking quite different than my basic pattern, adapting it is quite simple. I learned how to transfer darts into gathers in Craftsy’s class ‘creative darts and seam lines’. The only things I had to do to make this pattern was making the waistband, rotating the bust darts into shoulder darts and then change the darts into gathers. I can make a tutorial for this one if you wish! (Edit: you can find it here)

BW2

De rok is wederom een halve cirkel. Ik twijfelde eerst tussen een paar verschillende rokvormen, en dus vroeg ik mijn Instagram-vrienden om raad. De cirkelrok was de winnaar. Ik had al een patroon voor een volle cirkelrok gemaakt maar die paste niet op mijn stof. Hmm. Dan maar weer een halve, en uiteindelijk past dat denk ik ook beter bij dit model dan een volle.

The skirt is another half-cirkle. I debated some other skirt shapes and asked my Instagram friends for advice. The cirkle skirt was most popular. I made a pattern for a full cirkle but it didn’t fit on my fabric. Hmm. So another half cirkle it was, and I think it matches this shape very well.

BW5

De rits zit dit keer middenachter, en het is een overlappende. De hals aan de achterkant is ook wat verlaagd, dat vind ik mooier dan een hoge. En het toffe van je eigen patronen maken, is dat je dat soort dingen ook zelf kan bepalen 🙂

I put the zipper at the centre back of the dress and made it a lapped one. I also lowered the back neckline, as I like it better then a high one. That’s the cool thing about making your own patterns, you just decide all those things yourself 🙂

BW1

En in een swing dress hoor je te swingen. Al is het nog best moeilijk om dan een beetje charmant op de foto te komen!

A swing dress is made for swinging. Although it is kind of hard to do that and look good on the photo!

BW4

Details

Over naar de details / Onto the details

BW9

Hier zie je ietsje beter hoe het patroon in elkaar zit. En de stipjes, mijn camera vindt die lang niet zo leuk als dat ik ze vind.

Here you can see the shape of the pattern more clearly. And the dots, my camera doesn’t like them as much as I do.

BW11

Het bovenlijfje is gevoerd met donkergroene batist, dat ook meteen als proefmodel gold. De tailleband van de voering heb ik voorzien van vlieseline zodat ‘ie niet uitrekt. De voering is met de hand vastgenaaid bij de taille en de mouwen. Voor de zoom gebruikte ik een wit satijnen biaisbandje, dat ik met de machine vaststikte. Na een aantal handgezoomde jurken was mijn geduld daarvoor even op haha.

The bodice is lined in dark green cotton batiste, which was also my muslin. I interfaced the lining waistband so it would’t stretch. The lining is handstitched to the dress at the waist en the sleeves. For the hem I used a white satin bias tape. After hand hemming a couple of dresses my patience for that has run out a bit haha.

Met het risico om in herhaling te vallen: ik ben superblij met deze jurk. Ik vind de vorm erg mooi en hij zit erg lekker. En wat is dat gaaf, om iets dat al zo lang in je hoofd zit eindelijk te realiseren!

So at the risk of sounding like a broken record: I am more than happy with this dress. I love the shape of it, and it is quite comfortable. And how good it feels to be able to turn an idea that’s been in your head for so long into reality!

BW7

Bedankt heit, voor de mooie foto’s en de gezellige middag!

Thank you dad, for the pretty pictures and the fun afternoon!

On patternmaking, inspiration and copying

De laatste tijd ben ik flink aan het patroontekenen geslagen. Viel het erg op? 😉 Nu vraag ik me er wel wat over af, en ik ben benieuwd naar jullie mening hierover.

Lately I’ve been making some patterns and really enjoying it. You have probably noticed 😉 Doing so, I started wondering about something, and I’d like to hear your opinion about it.

In hoeverre is het erg om een bestaand naaipatroon te gebruiken als inspiratie om zelf een patroon te maken? Ik deed dat met dit en dit patroon, dat is gebaseerd op de Crepe van Colette patterns. Maar aangezien ik dat patroon ook heb gekocht, lijkt me dat geen probleem. Maar hoe zit het als je het patroon niet hebt gekocht, en je maakt een patroon dat er precies op lijkt? Een patroon alleen voor jezelf, niet voor commerciele doeleinden?

Is it a bad thing to use an existing sewing pattern as inspiration do make your own? I did that with this and this pattern, which is based on Colette’s Crepe pattern. Since I own that pattern, I’m sure it is no problem at all. But what if you don’t own the pattern, and you make one that looks exactly like it? A pattern just for personal use, not for commercial purposes?

20140629-221544-80144037.jpg

Vandaag heb ik een patroon gemaakt dat er precies zo uitziet als de Hazel, ook van Colette. Ik had natuurlijk het patroon kunnen kopen maar besloot om er zelf eentje te tekenen, want:

– doen = leren, en het ontwerp leek me een uitdaging en tegelijkertijd simpel genoeg om te kunnen maken.
– Colette patronen passen mij over het algemeen niet zo goed, dus het scheelt veel aanpassen want ik weet bijna zeker dat mijne wel past
– een patroon tekenen is sneller dan een pdf patroon printen en in elkaar puzzelen

Today I made a pattern that looks just like the Hazel, also from Colette patterns. Ofcourse I could have bought the pattern but decided on making one because:

– doing = learning, the design looked like a achievable challenge to me
– Colette patterns don’t fit me that well so I save myself lots of time adjusting, since I am almost sure my pattern fits
– making a pattern is much faster than printing and assembling a pdf pattern.

Maar het voelt niet helemaal lekker, om een ontwerp zo te kopieren. Ik heb wat gegoogeld maar ik kon er niet heel veel over vinden, of dit nou wel of not done is. Heather B heeft een post geschreven over haar Fauxneta, en Megan Nielsen zegt er in de comments op deze post iets over. Verder vond ik niks. Dus ik tast een beetje in het duister. Wat vinden jullie? Is het ok om zo een patroon na te maken of zou ik eigenlijk het patroon alsnog moeten kopen om zo toch te betalen voor het ontwerp?

Ik ben benieuwd!

But I feel a bit weird about it. I googled but couldn’t find a lot of information on this subject. Heather B wrote a post about her Fauxneta, and Megan Nielsen wrote about it in the comments on this post. That’s all I could find. So I’m a bit in the dark here. What do you think? Is it ok to make your own pattern based on an existing pattern you don’t own? Should I buy the pattern anyway as a way to pay for the design?

I’m curious what the opinions are on this subject!