Late to the party…

De maxi rok party! / The maxi skirt party!


Maxi01


Ja, het is er echt eentje.


Yes, it really is a maxi skirt.


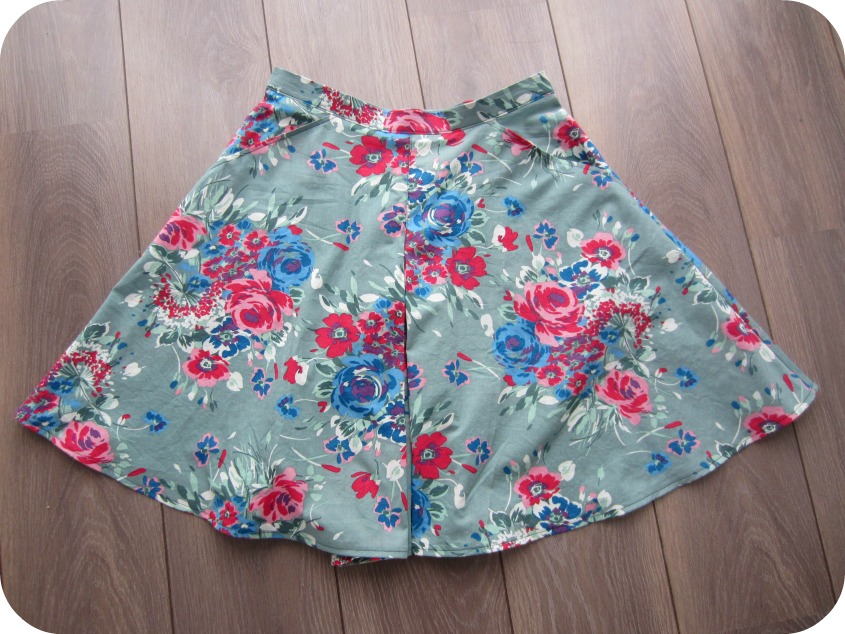
Deze katoentricot stof kocht ik een half jaar geleden met de bedoeling om er een Lady Skater jurk van te maken, maar ik twijfelde een beetje of de kleur niet té fel was. Twee weken geleden reed ik naar huis van het werk, een uur en een kwartier enkele reis, dus de ideale gelegenheid om een beetje te dagdromen over aankomende naaiprojecten. En opeens wist ik het: ik wilde een maxi rok maken van deze stof. Die avond maakte ik een patroon, en ook deze rok. Hoera voor dit soort snelle projecten!


I bought this cotton jersey fabric about six months ago with the intention of making a Lady Skater dress, but then I started to worry about the colour being a bit too much. Two weeks ago I was driving home after work, which is a 1 hour and 15 minutes drive and an ideal opportunity to daydream about upcoming sewing projects. Suddenly I knew I wanted to make a maxi skirt out of this fabric. I made a pattern and the entire skirt that evening. Hurray for instant gratification projects!


Maxi06


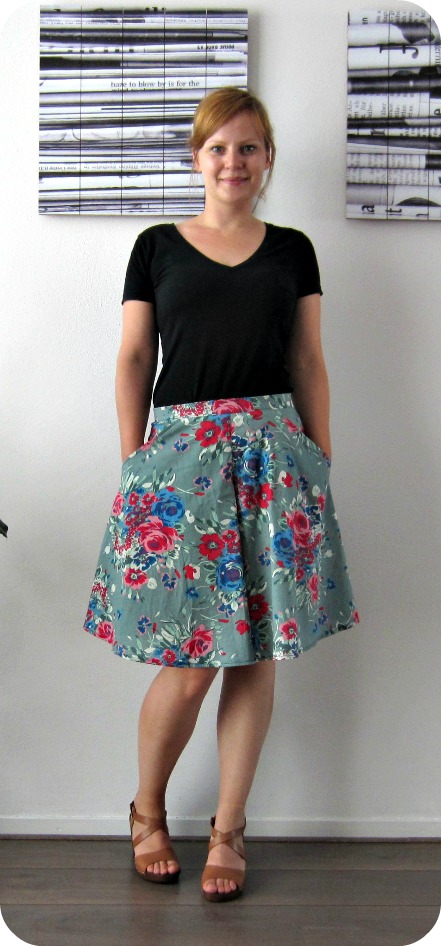
De foto’s zijn gemaakt tijdens een tussenstop onderweg naar het werk. Ja, ’s ochtends vroeg. Dus als ik er een beetje moe uitzie, dan weet je waarom 😉


I stopped on the way to work to take these photos. Yes, early in the morning. So if I look a bit tired, you know why 😉


Maxi05


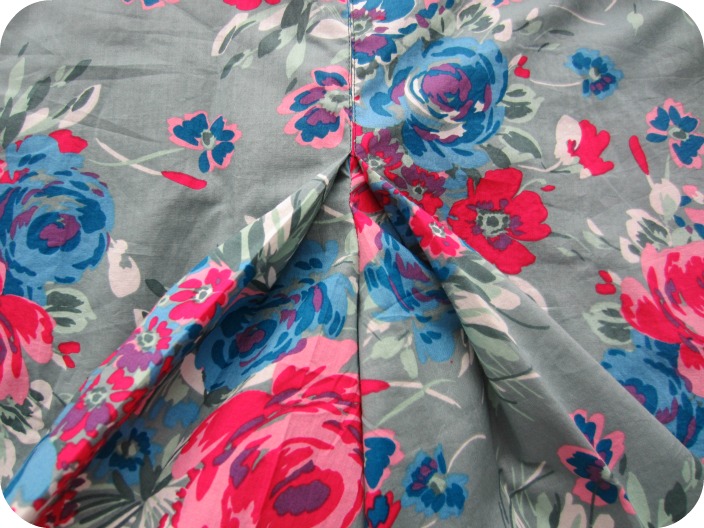
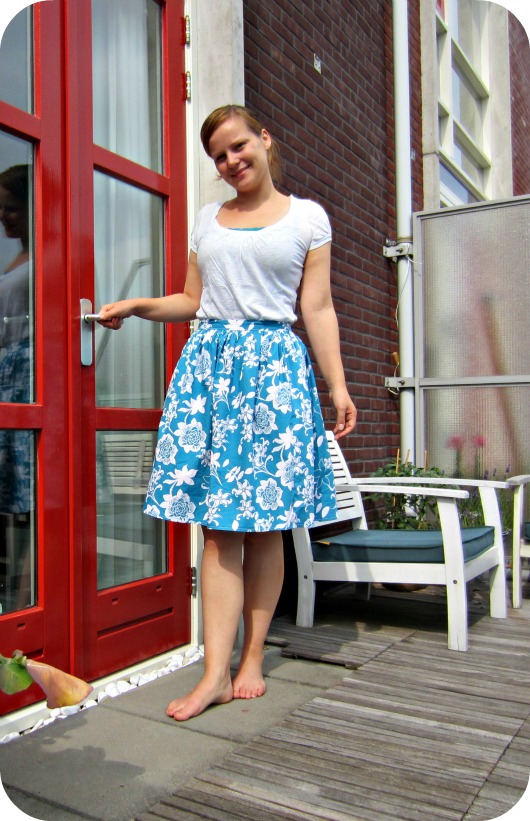
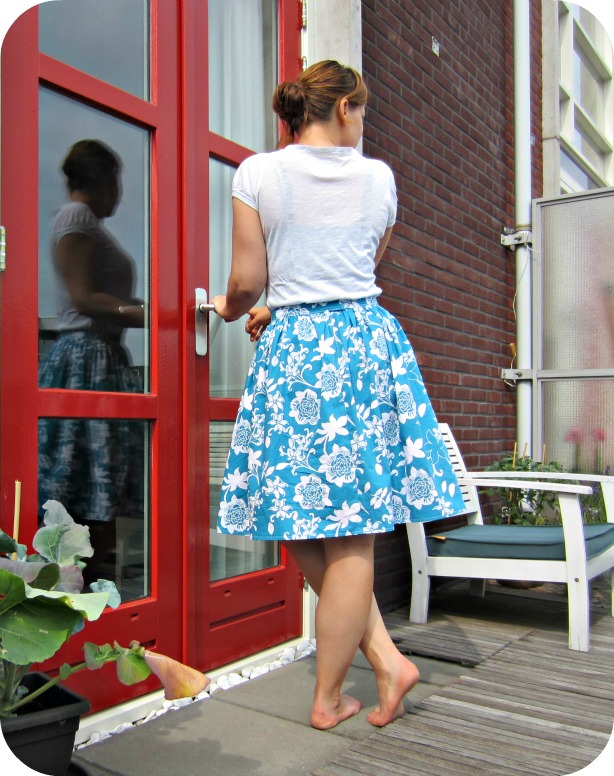
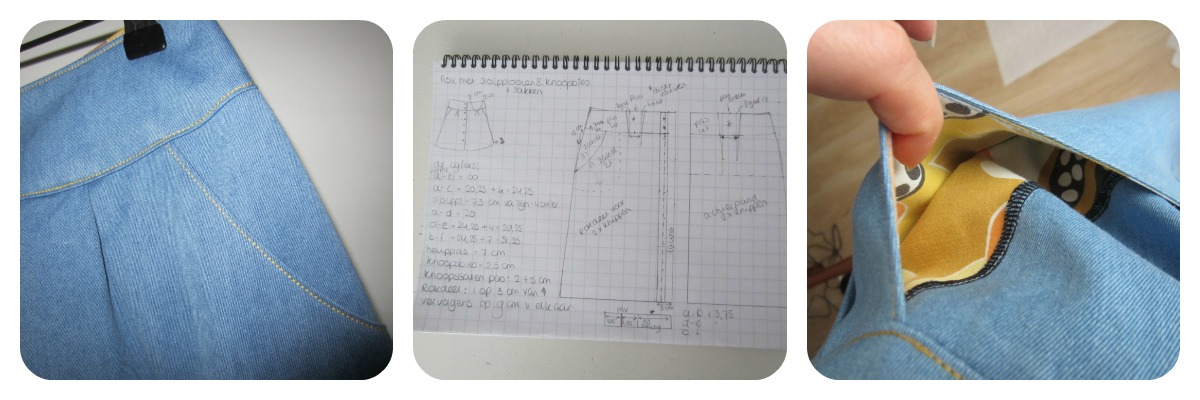
Op deze foto zie je goed hoe het patroon in elkaar zit (en dat ie wat te groot is uitgevallen, haha. Ach, iets om aan te passen voor de volgende keer!). Het is een hele basic rechte rok met een pas. De pas is dubbel gevouwen en zo aan de rok vast genaaid. Super simpel, en snel. En comfortabel. En precies wat ik in gedachten had.


On this picture you can see what the pattern looks like (and that it turned out a bit big at the waist, haha. Ah well, something to fix for the next time!) It is a basic straight skirt with a yoke. The yoke is folded at the top and sewed to the skirt like that. Super easy and fast. And comfortable. And exactly what I had in mind.


Maxi07


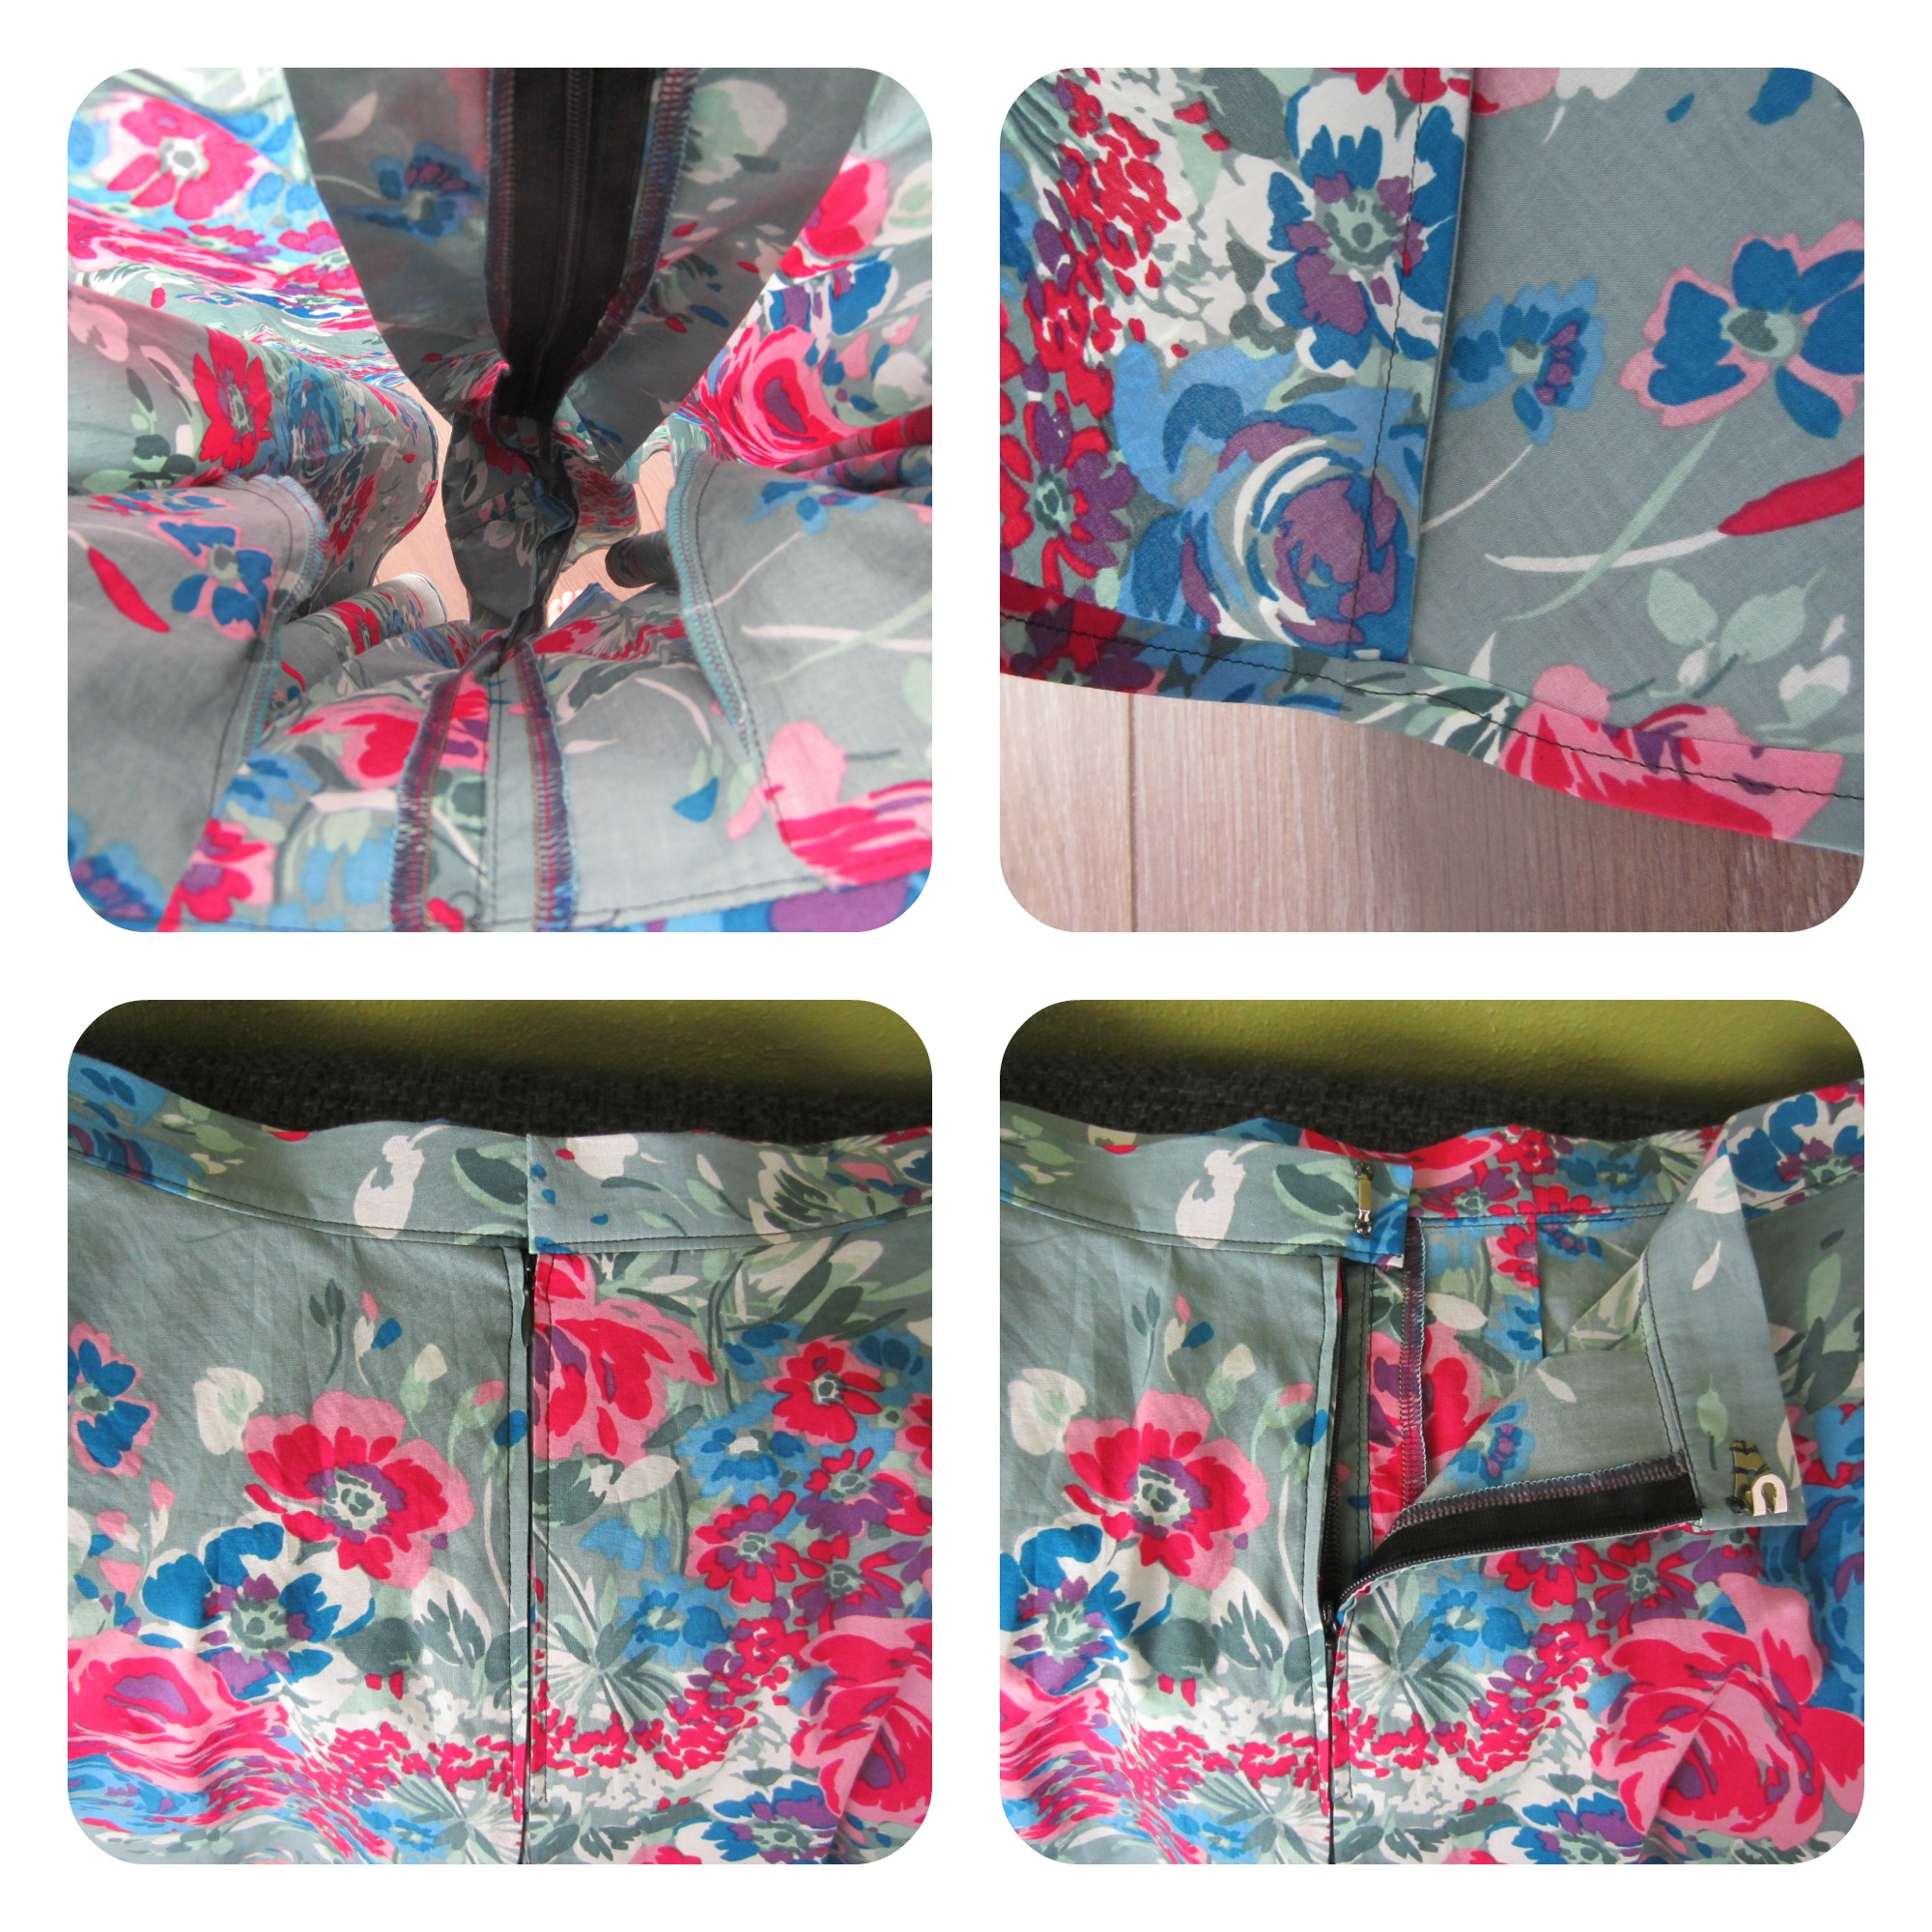
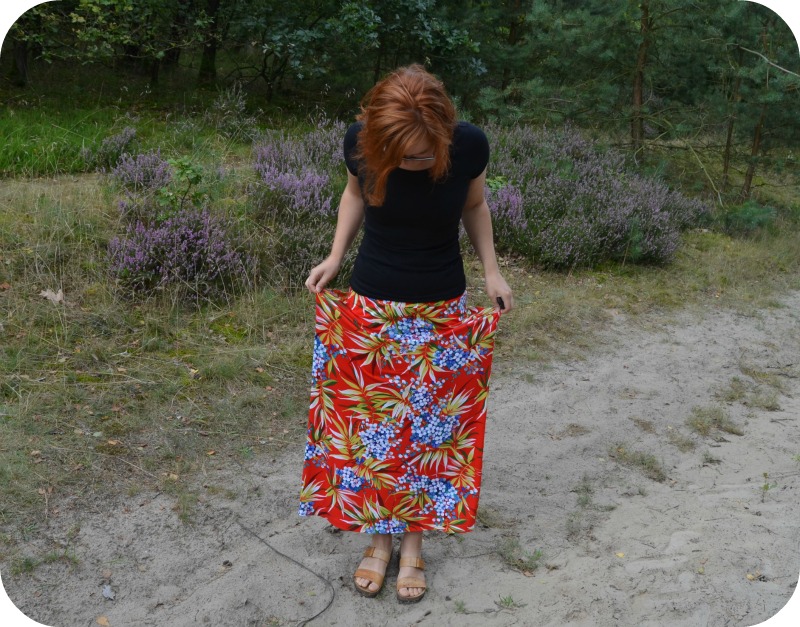
De rok loopt ietsje wijd uit aan de onderkant. Precies genoeg om er makkelijk in te kunnen lopen zonder dat de zoom uitrekt. Die heb ik voor het gemak maar weer met een rechte steek genaaid, net als bij mijn meest recente Lady Skater jurk. Want waarom moeilijk doen als het makkelijk kan?


The skirt flares out just a bit towards the bottom. Just enough to be able to walk easily without stretching the hem. So I used a straight stitch again, just like on my latest Lady Skater dress. Because why make things difficult when they could be easy, right?


Nu even over het dragen van deze rok. Ik dacht altijd dat maxi rokken niks voor mij waren. Ik ben niet zo groot en ik dacht dat ik daardoor nog kleiner zou lijken. Maar toen ik deze aantrok (en over de teleurstelling van de te wijde heuppas heen was 🙂 ) merkte ik hoe fijn dat eigenlijk zit. En hoe elegant dat voelt, de stof die langs je benen beweegt als je loopt. En hoe ‘put together’ zo’n rok voelt terwijl het tegelijkertijd voelt alsof je je pyjamabroek aanhebt. En ik hoef jullie vast niet meer te vertellen hoe een fan van pyjamas ik ben. Ik ben om, maxirokken FTW!


So a thing about wearing this skirt. I alwayw thought maxi skirts were not for me. I am not very tall and I always worried that they would make me look small and frumpy. But when I tried this one on (and after the initial dissapointment that the yoke was too big 🙂 ) I noticed how comfortable maxi skirts are. And how elegant it makes you feel, the fabric floating along your legs when you walk. And how ‘put together’ it feels while at the same time it feels like you’re wearing you pj bottoms. I’m sure I don’t have to tell you that I am a big fan of pj’s. I am sold, maxi skirts FTW!


Maxi02

feeling all elegant…
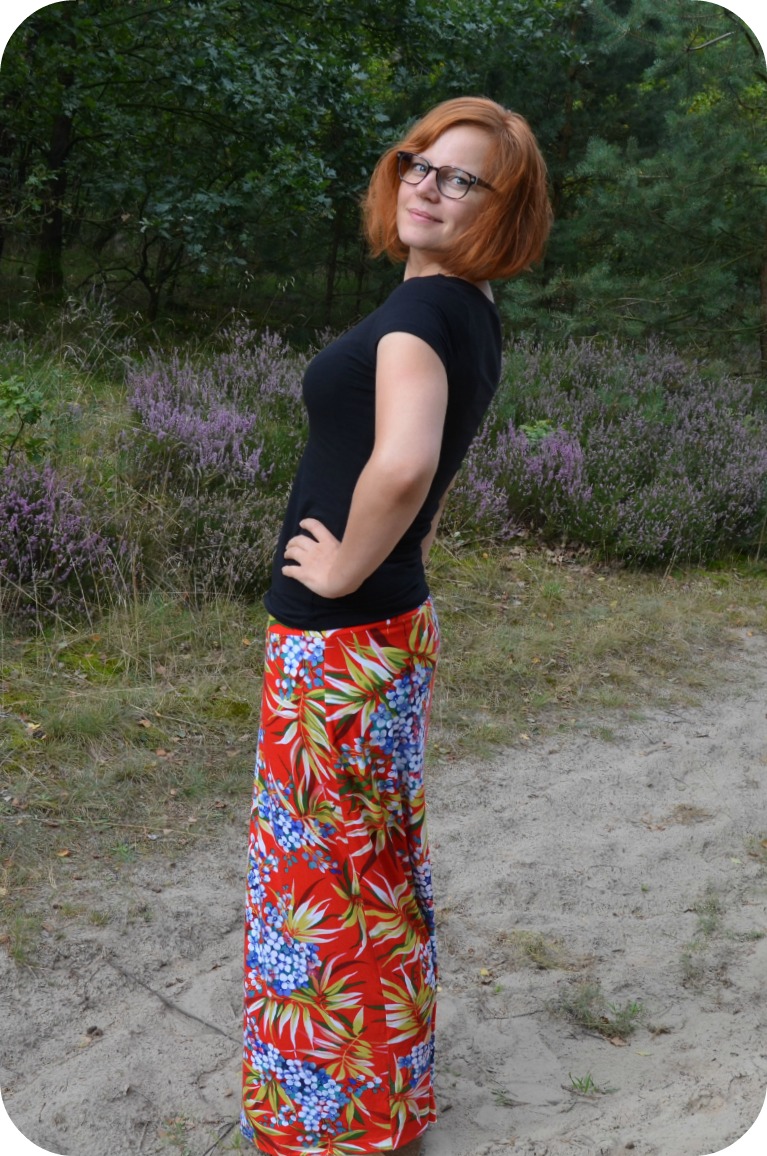
 

Maxi03

… and sassy!


Altijd fijn om zoiets te ontdekken aan het eind van de zomer. Volgend jaar meer, denk ik 😉 Wat is jouw ontdekking van deze zomer, op kleding/naai-gebied?


Always nice to discover such a thing at the end of summer. There will probably be more of these skirts next year 😉 What’s your fashion/sewing discovery of the summer?

Culottes

Oftewel, de broekrok. Alhoewel dat een veel minder mooi woord is natuurlijk, het klinkt vrij lomp.

Culottes6.jpg

Op vakantie in Japan zag ik ze heel veel,broekrokjes. En het leek mij ideaal, aangezien ik als ik rokjes draag nog wel eens last heb van schurende bovenbenen in de zomer (of is dat too much info?). En dat doet zeeeer!

On holiday in Japan I saw a lot of culottes. They seemed ideal to me, because my thighs rub together when wearing skirts and that’s really painfull (or is that too much info?).

Culottes1.jpg

Daar in Japan besloot ik het al: ik wil ook een broekrokje proberen te maken. In de winkels keek ik hoe ze in elkaar zaten en kreeg ik al een beetje een idee. Terug van vakantie zag ik Megan Nielsen’s nieuwe patronen en daar zat een broekrok tussen. Voordat ik die kocht, zag ik Leila’s blogpost over haar zelfgetekende broekrok (die je echt even moet zien!), met een link naar deze tutorial, die ik uiteindelijk heb gebruikt.

Culottes3.jpg

So it was back there in Japan that I decided to try and make culottes. I checked them in the stores and got an idea of how they were constructed. Back home I read about Megan Nielsen’s new patterns and they included a culotte pattern! But before I bought that one I read Leila’s blogpost about her self-drafted culottes (go check them out, they look great!). It linked to this tutorial that I ended up using to draft my own pattern.

Culottes2.jpg

No idea where the muffin top look comes from 🙂

Het toffe van dit patroon is dat het op het eerste gezicht een gewoon rokje lijkt. En dat is het eigenlijk ook, het is een halve cirkelrok, maar dan met een ingebouwd broekje. Door de plooien middenvoor en -achter zie je daar echter helemaal niks van.

The great thing about this pattern is dat at first sight it looks just like a skirt. Which in fact it is, it’s a half circle skirt, but it has built-in pants. The pleats at center front and -back do a great job in hiding the pants-part.

Culottes4.jpg

Broekrokken, ideaal om te lopen als een egyptenaar, en….

Culottes, perfect for walking like an egyptian, and…

Culottes5

Om in de vakantiestemming te blijven, een sumo-worstelaar na te doen!

To stay in holiday spirits, to mimic a sumo wrestler!

Details

Culottes7.jpg

Op deze foto kun je de plooien (een soort stolpplooi) zien, die het broekstuk verbergen.

Here you can see the pleats (kind of an inverted pleat) that hide the pants-part.

Culottes8.jpg

Zo ziet het er van binnen uit. In de tutorial staat dat de rits in de zijnaad moet ivm de plooi in de middenachternaad. Ik hou niet zo van ritsen in de zijnaad en tijdens het maken van mijn proefmodel (!! jaja) ontdekte ik dat het prima mogelijk was om een onzichtbare rits in de plooi te verwerken.

This is how it looks from the inside. The tutorial suggests a side zipper because of the pleat in the center back seam. I’m not too fond of side zippers, and when I made my muslin (!! :o) ) I found out that it was possible to put an invisible zipper in the pleat.

Culottes Collage

Hoe dat zit kun je beter zien op bovenstaande foto’s. Mocht het niet duidelijk zijn en je wilt het wel weten, laat dan even een comment achter, dan maak ik een tutorial.

These pictures show how the zipper is inserted into the pleat. If this is not clear enough and you want to do this too, please leave a comment and I’d be more than happy to put together a little tutorial.

Dus, dat is de broekrok. Ik ben er erg over te spreken, het zit lekker, je kan er prima mee fietsen en geen schurende benen meer. Is dat genoeg om je over te halen om ook een broekrok te maken?

So, culottes. I’m very pleased with them, they’re comfortable, perfect for bicycling, and no more rubbing thighs. Is that enough to pursuade you to make culottes too?

Another full gathered skirt

Want ja, er moeten natuurlijk verschillende soorten stofjes en technieken worden uitgeprobeerd. Héél vervelend…

Because there are different sorts of fabrics and techniques to be tested. It’s a dirty job…

afgs1.jpg

Om nog een beetje licht te krijgen, heb ik foto’s gemaakt op ons balkon. Dat is nogal in het zicht, omdat we tegenover een appartementencomplex wonen. Ik hoop dat ook dat jullie een beetje over mijn ongemakkelijke blik heen kunnen kijken 🙂

To get a little light for the photo’s, I took them on our balcony. We live across the street from an appartment building, so it is in plain sight. This explains the awkward look, I hope you guys don’t mind 🙂

afgs2

Voor het vorige rokje gebruikte ik een batist, dit keer een ‘gewoon’ katoenen stofje, vorig jaar gekocht op het stoffenspektakel. Het viel me toen op omdat het lijkt op de stof waar ik vroeger als klein meisje eens een rokje van kocht toen we op vakantie waren in Frankrijk. Ah, jeugdsentiment…

The previous skirt is made of cotton batiste, this time I used a ‘normal’ cotton, bought last year on a big fabric market that hits my town twice a year. I immediately liked it because it reminds me of a skirt I bought on holiday in France when I was a little girl. Ah, memories…

afgs3.jpg

Wat ik vergat te vertellen in de Cambie-blogpost, en weer in die over het vorige rokje, is dat ik ze heb gerimpeld met tandfloss. In dit youTube filmpje wordt heel duidelijk uitgelegd hoe je dat kunt doen. Hierdoor zijn de rimpels veel makkelijker gelijkmatig te verdelen, iets waar ik altijd veel moeite mee had.

What I forgot to mention in the Cambie-blogpost and again in the one about the previous skirt, is that I gathered them with dental floss. This YouTube movie provides a thorough explanation. By gathering the fabric this way, it is much easier to get evenly disributed gathers, something I used to struggle with.

Details

afgs4.jpg

Aangezien ik geen blinde rits in de goede kleur meer had, gebruikte ik een gewone.

I didn’t have an invisible zipper in the right colour so I used a regular one.

afgs5.jpg

Een haak en oog als sluiting voor de tailleband

A hook and eye as waistband cloure

afgs7.jpg

Voor een vrolijke finishing touch: vier verschillende kleuren draad in de lockmachine 🙂

For a cheerfull finishing touch: four different colours of thread in the overlocker 🙂

afgs6.jpg

En de zakken. Zoals je ziet heb ik in plaats van twee drie patroondelen gemaakt waardoor de zakken wat meer naar voren zitten. Dat is op een veel logischere plaats als je je handen erin doet!

And the pockets. Instead of two pattern pieces I made three, which provides a much more logical place for putting your hands in the pockets!

En als laatste, voor degenen die zich afvroegen wat voor plant er steeds half op de foto staat: dat is een brocolli. Ik heb een moestuintje gemaakt op mijn balkon! Het groeit en bloeit op het moment dat het een lieve lust is, hartstikke leuk om te zien. En op de foto te zetten 😉

And at last, for those of you wondering what kind of plant is showing in those pictures: it’s a brocolli. I have a little vegetable garden on my balcony! At the moment it’s growing very fast, I love to see how the plants and vegetables develop. And to make pictures of them 😉

balkon.jpg

Multi-problem rokje

Dit is vast herkenbaar voor iedereen die wel eens iets maakt. Soms gaat het van een leien dakje, en soms lijkt alles wat je doet verkeerd te gaan. Bij dit rokje was het laatste het geval.

This is probably recognizable for everyone who makes things. Sometimes it’s all smooth sailing and sometimes everything you do seems to go wrong. This skirt is one in the second category.


MPR1

Zo op het eerste gezicht zie je dat er niet aan af. Gelukkig! De dingen waar ik tegenaan liep waren ook bijna allemaal wel te verhelpen, alleen wel een beetje irritant.

At first sight you can’t see it, luckily! The problems I‘ve encounterd were not permanent, but they sure were annoying.

MPR Collage

Een doorgestikte naad met een harige achterkant, een pas die op mysterieuze wijze niet paste (die naam, dat is natuurlijk ook de goden verzoeken!), en vlekken van het strijkijzer. Heel fijn.

Topstitching with hair, a facing that mysteiously didn’t fit, and stains from the iron. Nice, really.

Maar hé, uiteindelijk is het een hele leuke rok geworden!

But hey, it turned out to be a pretty nice skirt!

MPR2

Bonus: met mijn zondaghoofd op internet 🙂 Het patroon tekende ik zelf, geïnspireerd op Megan Nielsen’s Kelly skirt. Ik wou het patroon graag kopen, maar mijn bankrekening was het daar niet helemaal mee eens. Toen heb ik een soortgelijk patroon getekend. Mijn plooien zijn iets minder diep, en ik heb hem wat langer gemaakt. Ik hou van rokjes die net onder de knie vallen.

Bonus: my sunday-face on the internet 🙂 I drafted this pattern myself, based on Megan Nielsen’s Kelly skirt. I wanted to buy the pattern, but sadly my bank account didn’t agree. So I drafted my own pattern, based on hers. The pleats on my skirt are a bit smaller and the skirt is longer. I like my skirts to end just below the knee.

MPR3

De stof is een soepele, lichtblauwe spijkerstof. Ik kocht het op de markt hier in Leeuwarden, het was het laatste stukje op de rol, 80 cm en kostte 5 euro. Met het klosje garen en de knopen kostte dit rokje in totaal een zee van tijd en iets meer dan een tientje. Koopje toch?

The fabric is a soft, lightblue denim. I bought it on the market here in Leeuwarden, it was the last bit. I paid 5 euro for 80 cm. With the tread and the buttons, this skirt cost me a lot of time and a little more than 10 euro’s. That’s a steal right?

MPR4

Het doorstikken deed ik met een goudkleurige draad die ik nog had liggen, en met de driedubbele steek. Erg mooi geworden, al zeg ik het zelf! Ik heb mijn machine nu iets meer dan een half jaar en ik ben er nog steeds erg over te spreken, hij werkt erg prettig en maakt mooie steken.

For the topstitching I used a gold coloured that I already had, and the triple stitch on my machine. I love the way it turned out. I have gotten my machine a little over 6 months ago and Im still really happy with it. It’s great to work with and the stitch quality is very nice.

MPR Collage 2

Het enige dat ik een volgende keer anders zou doen is dat ik de pas aan de voorkant in het midden één of twee centimeter lager zou laten eindigen. Nu zit die naad precies op het ‘dikste’ gedeelte van mijn buik en dat zou ik liever anders zien. Het stoort me niet hoor, maar is meer een soort verbeterpuntje. Voor de rest ben ik super tevreden.

The only thing I would change if I would make this skirt again, is to lengthen the yoke by 1 or 2 centimeters. It hits right on the ‘biggest’ part of my belly and I think it would look better if it covered that part. It doesn’t really bother me though, I’m perfectly happy with this skirt as it is.

Wat me wel stoort, is dat ik vandaag eigenlijk wilde bloggen over een jurkje dat ik vorige week al afmaakte. Maar ik gooide het vanochtend zonder er bij na te denken in de wasmachine… Daarom hier een kleine sneak preview, zodra het droog, gestreken en op de foto gezet is meer!

What does bother me is that I was planning to write about a dress I finished over a week ago. But without thinking about it, I threw it in the washing machine this morning… So here is a sneak preview, more will follow as soon as it is dry, ironed and photgraphed!

MPR5