
Na 5 jaar naaien ben ik min of meer op het punt beland dat ik niks meer écht nodig heb qua kleding. Tijd om iets nieuws te proberen dus. Een Craftsy-sale verleidde mij tot het aanschaffen van Beverly Johnson’s cursus over beha’s maken. Beha’s vinden die goed passen en lekker zitten vind ik best lastig, omdat mijn ‘dames’ wel aan de brede kant zijn maar niet zo ‘diep’. Zelf beha’s kunnen maken zou dus wel van pas komen.
After 5 years of sewing, when it comes to clothes, there’s nothing I really need to make. Time to try someting new! A Craftsy sale lured me into buying Beverly Johnson’s bra making class. Finding a well-fitting and comfortable bra is not that easy because of the shape of the ladies: they’re quite wide but also a bit shallow. So bra making would be a usefull skill.
En dan begin je dus opeens weer helemaal als beginner. Ik had materiaal nodig, maar wat precies en wat nou het goede spul was, géén idee. Daarom kocht ik de speciaal samengestelde cursus kit. Wel hoge verzendkosten, maar ja, het is een investeeering, zo vertelde ik mezelf.
And suddenly I was a complete novice again. I needed materials, but how to find out which ones were the right ones? I had no clue. So I decided to buy the kit that’s specially made for the class. Shipping was a bit expensive but hey, it’s an investment right? At least that’s what I told myself.
Baby’s first bra 😀
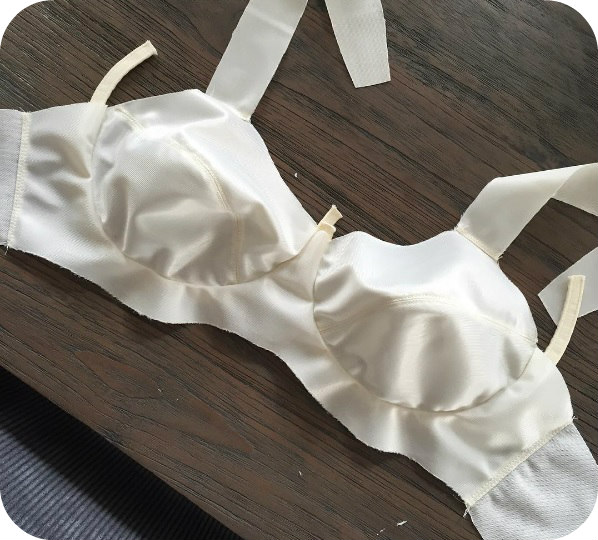
En zo ging ik aan de slag met het patroon dat bij het pakket zat: de Classic van Pin-up Girls. Dit was niet helemaal het type beha dat ik in gedachte had, ik heb liever een gevoerde beha. Niet iedereen hoeft te zien dat ik het koud heb if you know what I mean. Maar goed, je moet ergens mee beginnen en als het patroon éénmaal past kun je natuurlijk altijd nog aan de slag met padding etc.
And so it began, I started working with the Pin-up Girls Classic. Not exactly the type of bra I want to make, I prefer a padded bra. No-one needs to see it when I’m cold, if you know what I mean. But I figured that once the pattern would fit I could use it with padding or cut-and-sew foam.

Jep, een echte beginner. Dit zou een rechte schouderband moeten zijn..
Yup, a real novice. This is supposed to be a straight shoulder strap…

Scary pinning…
Net als bij het kopen van beha’s had ik wat gedonder met het vinden van de juiste maat. Volgens de maattabel moest ik een 34C maken. Die was te klein. Toen maakte ik een 34D. Die was veels te groot. Uiteindelijk maakte ik een 36C en verkortte de band. De band en de beugel pasten, maar de cup niet, die was nog te groot. Ik speldde het overschot eruit (eng!) en paste het patroon aan. Vervolgens maakte ik een exemplaar met een vulling van fiberfill. Ik las op de blog van Merckwaerdigh dat dat kon, en aangezien fiberfill niet zoveel kost leek het me de moeite wel waard om dat uit te proberen.
Just like in the shops it took some trial and error to find the right size. The size chart told me to make a 34C, which was too small. I made the 34D. Way too big. Then I made the 36C but changed the lenght of the band to the length of the 34 band. Then the band and the wires fit, but the cup was still too big. I pinned out the excess (scary!) and adjusted the pattern. I used this adjusted pattern to make a bra with fiberfill padding. I read on the Merckwaerdigh blog that this could be used instead of cut-and-sew foam, and since fiberfill is pretty cheap I thought it was worth a try.
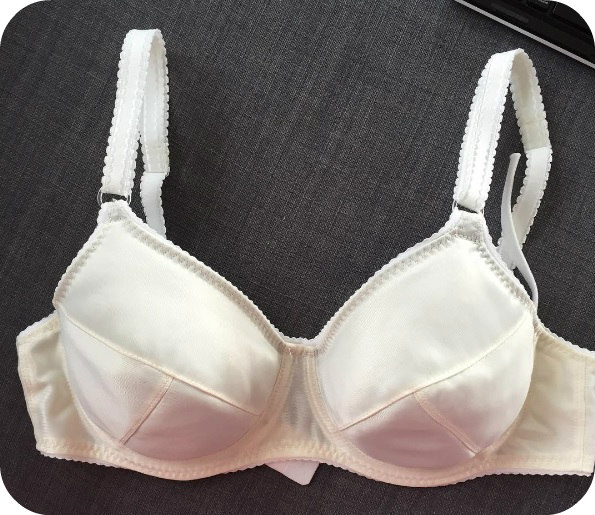
De fiberfill was min of meer een succes, maar het patroon nog steeds niet. Het leek vanaf de zijkant wel alsof er twee driehoekjes op mijn borstkas geplakt zaten. Ik was er wel klaar mee en besloot een ander patroon te proberen: de gratis Maya bra van AFI. Ik maakte een 75D, de maat die ik ook in de winkel koop. De maat van de cup checkte ik door de papieren patroondelen aan elkaar te plakken. Het bleek dat dezelfde aanpassing als in de Classic nodig was. Vervolgens maakte ik een proefje van een restje rekbare stof, dit keer met ‘echte’ padding.
The fiberfill as padding was ok, but the shape of the pattern stil wasn’t. From the side it looked like there were two triangles stuck to my chest. By that time I got quite cranky and decided to try another pattern: AFI’s free Maya bra. I made the 75D, the size I also buy at the store. I taped the paper pattern pieces together to check the cup size and did the same adjustment as on the Classic pattern. The I used a remnant of stretch fabric to make a trial version, with cut-and-sew foam this time.

Die paste op zich, maar gaf niet veel steun en lift (daarom zit de beugelband ook nog los, hij is niet afgemaakt). Pffft, ik had op dat moment helemaal geen zin meer om verder te gaan. Na een chagerijnig rondje Googlen kwam ik bij de patronen van Makebra. Die zijn speciaal gemaakt voor padding en zagen eruit alsof ze de vorm hadden waar ik naar zocht. Ik besloot om nog één keer te proberen voor ik de handdoek in de ring gooide.
It fit, but it wasn’t very supportive and lifting (the wire channel is still loose because I didn’t finish it). Ugh! I kind of lost steam there. After an hour or so of crankily Google-ing I stumbled upon Makebra patterns. They are especially made to use with cut-and-sew foam and looked like they give the shape I was after. I decided to try one of them before throwing in the towel.
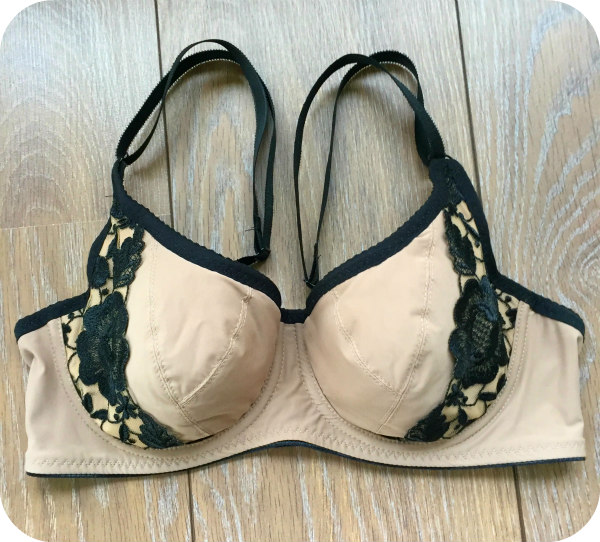
Dit is de DL01 in maat 75C, met een voering van fiberfill. De band is ietsje te lang maar voor de rest past ‘ie goed. Hij geeft ook een mooie vorm. Eindelijk! Ik was zo blij (en trots, haha)! Je ziet bij de cups dat de stof nog wat hobbelt, ik had hem iets strakker over de fiberfill moeten trekken. Deze beha heb ik een paar keer gedragen en hij zit op zich heel comfortabel, maar doordat de voering dit ik voor de cups heb gebruikt kleine gaatjes heeft prikt de fiberfill er wat doorheen. En dat jeukt! Weer een les geleerd, haha!
This is DL01 in 75C, with fiberfill padding. The band is slightly too long but other than that the fit is good, and it has a nice round shape. Finally! I was so happy (and proud, haha)! You can see that the fabric is in the cups is a bit wobbly, I should have pulled it tighter over the fiberfill. I’ve worn this bra a few times and it’s quite comfortable, but the lining in the cups is sheer and the fiberfill pokes through, which itches! Another lesson learned I guess, haha!
Dit was deel 1 van mijn beha-maak-avonturen. Met een happy end, gelukkig. In de volgende post het vervolg, anders wordt het wel een erg lang verhaal 🙂
So this was part 1 of my adventures in bra making land. With a happy ending, fortunately. I don’t want to make this post too long so the sequel is in the next post 🙂

Ik volg je blog maar reageer nooit maar lees je wel graag. Leuk dat je aan bh’s begint. Bij Kantje boord in Amsterdam kun materiaal setjes kopen waar alles in zit voor € 25 – 30. Echt een aanrader (m.a.w. Walhalla).
Hoi Jaqueline, dank je wel voor je berichtje en de tip! Ik ben er wel eens geweest maar toen was ik er voor iets anders en was ik ook nog niet into beha’s maken. Denk ik dat ik er binnenkort maar weer eens naartoe moet 🙂
Oh… Zo leuk te lezen…. Sta nog voor de drempel om hieraan te beginnen 😜 maar het moet er toch maar eens van komen…
jaaa hup, aan de slag! Het is zo leuk (wel even de frustratie wegdenken als je bh niet past nadat je hem helemaal hebt moeten afmaken om te kunnen passen, maar hé, oefening baart kunst 😉 )
Ik heb het ook zo vaak geprobeerd maar het vinden van het juiste patroon in de juiste maat is zo moeilijk..
Dat is inderdaad misschien wel het allerlastigste…Vooral omdat je je hele bh af moet maken voor je hem fatsoenlijk kunt passen, frustrerend!
Ja misschien doe ik nog wel weer een poging binnenkort, ik ben wel minder slordig en ongeduldig tegenwoordig!
Wauw. Dat klinkt moeilijk allemaal. Ik ga een keer de Watson bra maken. Niet een ‘echte’ BH. Gewoon om thuis lekker te loungen. Leuk voor jou dat het uiteindelijk goed is gekomen 🙂
Valt best mee, het is leuk om te doen. Alleen de goede pasvorm vinden was dus even een dingetje. Watson lijkt me een fijn patroon, voor van die heerlijke relaxdagen 🙂
Pingback: Maya bra | IngeMaakt