Long Sleeved Lady Skater

LadySkater01


Het Patroon Waar Alles Al Over Gezegd Is, oftewel: de Lady Skater. Na drie versies, bovenlijfje wat inkorten, rok wat langer maken, bovenlijfje nog wat inkorten enzovoorts had ik daar toch een perfect passend patroon van gemaakt. Dus toen ik, veroorzaakt door mijn nieuwe lockmachine, een stapel tricot en wintertricot stoffen kocht, leek dat me een mooi patroon om mee te beginnen.

The Pattern Everything Has Already Been Said About, a.k.a. the Lady Skater. After three versions, shortening the bodice, lengthening the skirt, shortening the bodice a tad more and so on, I had made it into a perfectly fitting pattern. So when my new overlocker inspired me to go on a knit fabric binge, this seemed like the perfect pattern to start sewing them up.


LadySkater03


Deze stof is een mengeling van polyester, viscose en lycra. Lekker warm en lekker zacht. Maar ook: ietsje minder rekbaar dan katoentricot. Vooral in de lengte. En zo veranderde mijn perfect passende patroon in een toch-wel-een-beetje-strak-en-aan-de-korte-kant bovenlijfje. Het is niet te klein, maar wel strak genoeg om het gevoel te krijgen dat ik de hele dag mijn buik in moet houden. Strakker dan ik gewend ben.

This fabric is a mix of polyester, viscose and lycra. Soft and cozy. But also: slightly less stretchy then a cotton knit. Especially lenght-wise. And so my perfectly fitting pattern resulted in a teeny-bit-tight-and-too-short bodice. It’s not too small, but it is small enough to make me feel like I should hold my belly in the entire day. Tighter than I’m used to wearing.


LadySkater04


Zoals je ziet trekt de zijnaad een beetje naar binnen – dat komt omdat ik wat had zitten spelen met het differentieeltransport voordat ik ‘m naaide. En was vergeten de stand weer terug te zetten. Oeps. Ach, ik hoef me nu in ieder geval geen zorgen te maken om uitgezakte zijnaden zoals bij de eerste twee Lady Skaters 🙂

As you can see the side seams pull a bit to the inside – it’s because before I sewed the seam I played around with the differential feed, and forgot to put it back to the proper settings. Oops. Ah well, at least I won’t have to worry about saggy sides like with the first two Lady Skaters I made 🙂

LadySkater02

Oke, dat klinkt allemaal wel een beetje negatief. Desondanks ben ik wel erg blij met deze jurk! De stof is lekker warm en zacht en ondanks het strakke is ‘ie toch erg comfortabel. Dat strakke zit denk ik ook vooral in mijn hoofd. Tot een paar jaar geleden was ik wat steviger en toen had ik een ontzettende hekel aan het stuk waar mijn maag zat. Dat stak uit, en dat vond ik er zo lelijk en lomp uitzien. Dat is nu niet meer, en ik ben nu goede vriendjes met mijn lijf. Maar kennelijk is er toch een maag-vormig littekentje op mijn zelfbeeld achtergebleven, wat getriggerd wordt door kleding die op die plek strak zit. Suf! Heb jij ook wel eens iets gemaakt wat jouw body-issues uit het verleden triggerde?

Well, that all sounds a bit negative. I am very happy with this dress though! The fabric is warm and soft and despite the tightness it is pretty comfortable. I think the tightness is for a part in my mind. Untill a few years ago I was a bit heavier, and I really hated the upper part of my stomach. It was sticking out a bit and I thought that looked very ugly. Fortunatly that’s no longer an issue and I have become good friends with my body. But apparently there is still a little stomach-shaped scar on my self-esteem. Lame! Have you ever made something that triggered past body-issues?


Me-main

Soms heb je ineens zo’n vlaag van inspiratie en weet je opeens precies wat je wilt gaan maken, en van welke stof. Dat had ik al eerder een keer bij mijn maxirok, en ook na het maken van de flamingo jurk bij deze jurk. Opeens zat het idee in mijn hoofd en het liet me niet meer los. En dus ging ik maar aan de slag, want wat moet je anders?

Do you know how you sometimes get a whiff of inpsiration and you suddenly know exactly what to make and with which fabric? This happened with my maxi skirt and after finishing the flamingo dress it happened with this dress too. The idea was stuck in my head and wouldn’t go away. So I went for it, what else was there to do?


waxprint01


Het is weer een versie van mijn basispatroon. De inspiratie voor de halslijn kwam van een afbeelding op de achterkant van “Gerties new book for better sewing“. De kapmouwtjes zijn iets wijder gemaakt, het leek me leuk als de vloeiende vorm van de halslijn daarin terug zou komen. De rok komt van de Mortmain jurk van Gather (vandaar ook de naam van deze post). Dat patroon gebruikte ik al eerder voor een wax print stof en door de stijfheid van de stof komen de plooien mooi uit. Om toch een beetje variatie aan te brengen naaide ik de plooien dit keer andersom. En, omdat ik even geen rekening had gehouden met de tailleband in de Mortmain, is de rok een stukje korter dan de andere.

This is another adaptation of my basic bodice pattern. The inspiration for the neckline came from a picture on the back of “Gerties new book for better sewing“. The cap sleeves are a bit more exagerated because I thought it would be nice for them to have the same flowing line as the neckline. The skirt pattern is from Gather’s Mortmain dress (hence the name of this post). I used that pattern for another dress from wax print fabric and knew that the stiffness of the fabric would hold the pleats very well. This time I reversed the pleats, for a bit of variation. And, because I forgot to take into consideration that the Mortmain has a waistband, the skirt is a bit shorter.


Waxprint03


Aan de achterkant zette ik er een ‘exposed’ rits in, gewoon omdat het kan 🙂 Wel een goed idee om die de volgende keer even helemaal dicht te doen als ik foto’s maak…

It has an exposed zipper on the back, just because 🙂 And yes, I will check if it’s zipped up all the way to the top before taking pictures next time…


Waxprint02


De stof komt van een markt in Amsterdam, er was daar een stoffenkraam die allemaal wax prints verkocht voor 5 euro per meter. Ik snap achteraf niet zo goed waarom ik maar twee stoffen heb gekocht daar. Misschien omdat ik er nog de hele dag mee in een plastic tas moest sjouwen? Anyway, ik was meteen verliefd op de kleuren. Voor het bovenlijfje heb ik wel een beetje gelet op de plaatsing van de print. Ik kon me nog een bepaald tv-momentje herinneren…

The fabric was bought at a market in Amsterdam, there was this place that sold all kinds of wax prints for 5 euros a meter. Looking back I cannot believe I bought only two fabrics. Maybe because I had to carry them around with me all day? Anyway, I fell in love with those colours immediately. The print did cause me to be a bit carefull with the pattern placement, because there was a certain tv-moment I remembered…


http://instagram.com/p/rz5kjdEe8y/?modal=true


Juist, het leek me beter om dat te voorkomen 😉

I figured it would be best to prevent such a thing 😉

 
Waxprint05

Zoals je ziet heeft de zoom een biaisbandje gekregen. Verder zijn alle naden met de lockmachine afgewerkt. Ik was te lui om de draden te wisselen wit leek me wel een geschikte kleur, er zit immers ook wit in de stof. Het beleg is een alles-in-één-beleg. Ik vind het zo tof dat het er dan zo netjes uit komt te zien.

As you can see the hem was made with some biastape. The seams have been finished witht the overlocker. I was too lazy to change the threads I thought white was an appropriate colour since there is some white in the fabric, too. The neckline and shoulders are finished with an all-in-one facing. I love how neat this looks.


Waxprint04


En nog een keer de achterkant. De rits kan heus tot bovenaan dicht 😉 Ik ben blij met deze jurk!

And the back side again. The zipper does go all the way up 😉 I am really happy with this dress!


Flamingo fakery

Één ding is zeker in het leven: als je gedurende het jaar een jurk maakt met flamingo’s, en je wacht lang genoeg met het bloggen ervan, dan wordt het vanzelf een keer Jungle January. En omdat mijn ‘officiële’ Jungle January jurk waarschijnlijk niet op tijd klaar is, moeten jullie het hier maar even mee doen 😉

In life, one thing is sure: if you make a dress with flamingos on it, and you wait long enough before you blog it, it will eventually become Jungle January. And because my ‘official’ Jungle January dress probably won’t be ready in time, you’ll just have to make do with this one 😉

Flamingo04

Goed, met een beetje valsspelen dus, want gemaakt in oktober: mijn flamingojurk. Zelfgemaakt patroon, met een geplooide rok. De stof komt van hier, al zie ik hem er nu niet meer tussen staan.

So, with a bit of cheating, it being made in october, here it is: my flamingo dress. I made the pattern too, it has a pleated skirt. The fabric is from here, but I think it has sold out because I can no longer see it on the site.

Flamingo06

Ik weet niet zo goed wat ik nog meer kan vertellen eigenlijk. Het is zo fijn om een patroon-op-maat te hebben wat je naar wens kunt aanpassen! Nu ik het al zo vaak heb gemaakt is het ook al zover bijgeschaafd dat het perfect past. Met kapmouwtjes dan. Volgende uitdaging: gewone mouwen tekenen.

I don’t really know what else to tell about this dress. It’s so nice to have a made-to-measure bodice pattern that you can adapt in any way you want. I have made it so many times and it has been refined to a perfect fit. With cap sleeves that is. Next challenge: drafting real sleeves.

Flamingo01

Bij de Hema vond ik zelfs nog een bijpassend vestje. Alhoewel, dat lijkt op de foto wat minder passend. Uiteraard komt dat door de belichting 😉

I have even found a matching cardigan. At least I thought it was, but it seems less matching on this photo. Let’s just blame the light for that 😉

Hoewel deze jurk al in oktober is gemaakt heb ik hem tot nu toe maar één keertje gedragen. Dat komt omdat ik ‘m niet mooi vind met een zwarte panty. En ik heb geen idee met welke kleur wel. Huidskleur misschien, maar is dat niet wat zomers? Wat voor kleur panty denk jij dat bij deze jurk staat?

Even though I made this dress in ocotber I have worn it just once. That’s because I don’t like tha way it looks with black tights. I have no idea wich colour of tights to wear this one with. Maybe sheer tights, but isn’t that a bit summery? Which colour of tights would you wear with a dress like this?

Flamingocollage


Nog een paar details: de halslijn en de mouwtjes zijn afgewerkt met een satijnen biaisbandje. Voor de zakken had ik niet genoeg stof, dus maakte ik die van witte katoen. De rits zit in de zijnaad en is met de hand ingezet. De zoom is ook handgenaaid.

A few details: the neckline and sleeves are finished with satin biastape. I didn’t have enough fabric for the pockets so I made them from some plain white cotton. The zipper is in the side seam and is hand stitched. The hem is also hand stitched.

Flamingo02

Een flamingojurk is niet compleet zonder flamingo pose toch? 😉

A flamingo dress is not complete without a flamingo pose right? 😉

the hangover – sew it up

Joehoe! Dat is een tijd geleden! Nou ja, nieuw jaar, nieuwe kansen laten we maar zeggen 🙂

Hello! It’s been a while! Let’s just say a new year, new opportunities 🙂

2015/01/img_0289.jpg

Lekker wakker begin ook 😉

Yeah, fresh start right 😉

2015/01/img_0290.jpg

Even uitrekken dan maar…

Maybe a bit of stretching will help…

Goed. Ik heb weer iets gemaakt! Voor de Sew it Up Monthly. Dit keer is het thema ‘the hangover’. Nu moet ik zeggen dat ik niet zoveel met ‘hangovers’ heb. Ten eerste drink ik (bijna) niet, en ten tweede kom ik zo goed als nooit meer in de kroeg. Maar ik heb des te meer met pyjamadagen. En een pyjamadag is eigenlijk een beetje een hangover zonder hangover, toch?

Right. I made something! It’s for the Sew it Up Monthly. The theme this month is ‘the hangover’. Hangovers are not really my thing. I (almost) don’t drink, and I very rarely visit a bar anymore. However, pajama days are absolutely my thing, and pajamadays are like a hangover without the actual hangover right?

2015/01/img_0291.jpg

Oh kijk, ik heb nog een taille na alle feestdagen 🙂

ah look, I still have a waist after the holidays 🙂

Het patroon dat ik gebruikte komt uit de nieuwe La Maison Victor. Leuk blad is dat! Het is de Rianne jurk. Een simpel patroon, waarvoor ik een punto di roma tricot gebruikte. Die waarschijnlijk iets te dik is voor het model want het flatteert niet echt. Maar ja, who cares, want het zit als een pyjama maar ik kan er ook in naar de supermarkt. Dat is een succes in mijn boekje!

The pattern I used is from the most recent issue of La Maison Victor. I really like that magazine! It’s the Rianne dress. I used a punto di roma fabric. Which is probably a bit too thick for this pattern because it didn’t turn out to be quite flattering. I don’t really care though, because this dress feels like pajamas but is also suitable for a quick trip to the grocery store. That’s a succes in my book!

2015/01/img_0295.jpg

Om deze jurk een extra ‘hungover’ uitstraling te geven heb ik de halslijn, de mouwen en de zoom alleen een lockstiksel gegeven. Het patroon schreef dat voor voor het tunneltje voor het taillekoord en ik dacht, waarom ook niet bij de rest. In plaats van een koordje gebruikte ik een bandje van kant, gewoon omdat ik dat leuk vond.

To give this dress a bit of an extra ‘hungover’ vibe I finished the neckline, the sleeves and the hem with an overlocked edge. The pattern suggested this for the waistband tunnel and I thought, why not do this to the rest of the edges too. Instead of a piece of robe I used a piece of lace tape, because I liked that.

Het resultaat is een ultiem comfortabele jurk. Mocht ik ooit nog een echte hangover krijgen, dan weet ik wat ik aantrek!

The result is an extremely comfortable dress. If I would ever get a real hangover, I’ll know what to wear!

2015/01/img_0294.jpg

Mijn pyjamadag-partner-in-crime is ook enthousiast 🙂

My pajama-day-partner-in-crime is also very enthousiastic 🙂

Holiday sho(r)ts

Ik weet niet hoe het met jou zit, maar als ik op vakantie ben leef ik in korte broeken. Zeg maar de pyjamabroek van de vakantie 🙂 Vlak voordat we vertrokken flansde ik er nog even twee in elkaar. Eentje van een stof die ik kocht op het stoffenspektakel, en eentje van de resten van mijn Oonapalooza rokje.


I don’t know about you but when I’m on holidays I basically live in shorts. They are like the PJ pants of holidays. So before we left for our trip I whipped up two pairs. One from a fabric I bought at the bi-annual big fabric market and one from the remnants of my Oonapalooza skirt.


Holiday_shorts01


Omdat de stof van beide broekjes wat stretch heeft zijn ze een beetje groot uitgevallen. Dat is stiekem héél comfortabel en aangezien ze echt voor de vakantie bedoeld zijn dus helemáál niet erg!


Because the fabrics both have some stretch in them they are a bit big. But since that’s very comfortable and these are really just holiday shorts, who cares right?


Holiday_shorts05

verplichte toeristenfoto 😉 / obligatory tourist shot 😉


Het patroon voor deze broekjes is hetzelfde als dat ik voor dit en dit exemplaar gebruikte: een aangepaste versie van de Colette Iris. Met steekzakken en een rits middenachter. Heel basic dus, en ideaal voor deze wat drukkere stoffen.


The pattern I used is the same as this and this pair of shorts: an adapted version of Colette Iris. It has slash pockets and a zipper at center back. Very basic, and very suitable for these busy prints.


Holiday_shorts02


Compleet met bijpassende verbrande benen 🙂


With complimentary sunburnt legs 🙂


Holiday_shorts04


Holiday_shorts03


Je kunt wel zien welke foto eerder in de vakantie is genomen, haha!


It really shows witch picture was taken earlier on in the holidays, haha!


Holiday_shorts10


Holiday_shorts06


De voorkanten. Bij het mintgroen met grijze exemplaar heb ik de naden doorgestikt met de driedubbele steek. Bij de andere niet, die stof is van zichzelf al druk genoeg. De zoom is afgelockt, omgevouwen en gestikt.


Front views. All the seams on the minty green and grey coloured one are topstitched with the triple stitch. The other one is not topstitched at all, because the print is busy enough as is.


Holiday_shorts09


Holiday_shorts07


En de achterkant, met een de rits. Een gewone dit keer, die had ik nog liggen.


Back view with the zipper, a regular one this time, because I had them in my stash.


Holiday_shorts08


De rits ging niet helemaal vlekkeloos erin… Ik schrok hier wel een beetje van, want ik dacht dat ik mijn naaimachine gesloopt had. “Gelukkig” was het helemaal mijn eigen schuld, want ik had de draadspanning niet teruggezet na een stukje rijgen. Deze achterkant heb ik maar zo gelaten, want ik had echt geen zin om dit allemaal los te tornen. Al helemaal niet meer toen ik bij de tweede keer naaien van deze stukken een stuk broekspijp meenam. Waarschijnlijk was ik aan vakantie toe 😉


The zipper didn’t go in seamlessly… I was a bit frightened I had broken my sewing machine when I saw this but “fortunately” it was all my bad, because I forgot to set the tension back to normal after basting the seam. Couldn’t be bothered to unpick all of this though, especially not when I caught on of the legs in the seam when I sewed it for the second time. I probably needed the holiday 😉


Holiday_shorts11


Nog een kleine close up van de doorgestikte zak en tailleband.


A little close up of the topstitched pocket and waistband.


Op vakantie was ik zo blij met deze broekjes, ze zitten heerlijk. Geen neiging om mijn pyjamabroek aan te trekken dus 🙂 Welk kledingstuk doet jou je pyjamabroek vergeten op vakantie? En is dit hetzelfde als thuis of toch anders?


I was so happy with these shorts on our holiday, they are very comfortable. In fact so comfortable that I didn’t even want to put on my PJ pants for lounging around 🙂 Which garment makes you forget yours when you are on holiday? And is this the same when at home or are things different then?


Fail along

Bonjour mes amis!

IMG_0268.JPG

Dit is mijn uitzicht bij het typen van deze post. Kon slechter he? We zijn op vakantie en na een paar dagen Zwitserland en een paar dagen Italie zijn we aangekomen in Frankrijk, het land van zon, kaas, wijn en roze toiletpapier.

This is my view while typing this post. Could be worse huh? We are on holidays and after visiting Zwitserland and Italy we have now arrived in France, country of sun, cheese, wine and pink toiletpaper.

Nu ik op vakantie ben wil ik het graag even hebben over sew alongs. Of beter gezegd: enthousiast ja zeggen en dan toch nee doen. Het gebeurde mij de afgelopen tijd drie keer. Oeps. Eerst met de Sporty Summer Sewathon, waarbij ik besloot om eindelijk het Bombshell badpak maar eens te maken, maar het voorval met het strijkijzer roet in het eten gooide.

Now I am on holiday I would like to talk to you about sew alongs. More specifically: signing up enthousiastically and then failing to meet the deadline. I recently did that. Three times to be precise. Oops. First there was the Sporty Summer Sewathon. I decided that was the perfect opportunity to finally make the Bombshell bathing suit, but the accident with the iron interfered with those plans.

IMG_0262.JPG

Toen was er de Summer Sundress sew along. Ik had al een poos het idee om van een bepaalde stof die ik ik Japan kocht een Colette Hazel jurk te maken, maar het kwam er steeds maar niet van. Uiteindelijk maakte ik het patroon zelf na en begon ik er met goede moed aan. Echter, gedurende het maken vond ik het steeds een minder leuke jurk worden. Heb je dat ook wel eens? Hij ligt er nu bij als op bovenstaande foto. Eigenlijk hoeven alleen de schouderbandjes er nog aan, de voering vastzetten aan de binnenkant en de rok omgezoomd te worden. Maar ja, toen gingen we op vakantie 🙂

Then there was the Summer Sundress sew along. I had been planning to make a Colette Hazel dress from some fabric I bought in Japan, but I never got around to it. I figured this sew along was the perfect opportunity. I knocked off the pattern and started sewing. But somewhere in the process I started to loose interest, and didn’t really like how it was turning out. Do you have this too sometimes? So the status of this dress is pictured above. All that’s left to do is put on the straps, sew the lining to the inside and hem the skirt. But then we went on holidays 🙂

Deze twee voel ik me niet zo schuldig over, maar de volgende wel.

I’m not feeling too guilty about those two, but the next one I do feel bad about.

IMG_0265.JPG

Het is de jurk die ik wilde maken voor de August Tribute month van de Sewcialists. Ik had graag gewild dat ik deze op tijd af had gekregen, maar helaas. Extra jammer vind ik het omdat ik deze maand samen met Alison de ‘host’ ben voor het thema. Dus bij deze: sorry sewcialists!

This is the dress I wanted to make for August Tribute month over on the Sewcialists blog. I really wish I had finished this one in time since I am hosting this months theme along with Alison. But alas, it didn’t happen. Sorry Sewcialists!

Ondanks mijn schuldgevoel hebben we wel een hele fijne vakantie hoor 😉

Despite feeling guilty we are having a wonderfull holiday 😉

IMG_0263.JPG

Hiking in Zwitserland

IMG_0264.JPG

Het dorpje waar we verbleven in Italie / the little village we stayed in in Italy

IMG_0266.JPG

Italiaanse tomaten zijn de beste / Italian tomatoes are the best

Jongens, vertel eens: ik ben vast niet de enige die wel eens te veel hooi op haar vork neemt. Hoe zorg jij ervoor dat je je niet overcommiteert?

So guys, please tell me I am not the only one that overcommits from time to time. How do you prevent yourself from doing that?

Late to the party…

De maxi rok party! / The maxi skirt party!


Maxi01


Ja, het is er echt eentje.


Yes, it really is a maxi skirt.


Deze katoentricot stof kocht ik een half jaar geleden met de bedoeling om er een Lady Skater jurk van te maken, maar ik twijfelde een beetje of de kleur niet té fel was. Twee weken geleden reed ik naar huis van het werk, een uur en een kwartier enkele reis, dus de ideale gelegenheid om een beetje te dagdromen over aankomende naaiprojecten. En opeens wist ik het: ik wilde een maxi rok maken van deze stof. Die avond maakte ik een patroon, en ook deze rok. Hoera voor dit soort snelle projecten!


I bought this cotton jersey fabric about six months ago with the intention of making a Lady Skater dress, but then I started to worry about the colour being a bit too much. Two weeks ago I was driving home after work, which is a 1 hour and 15 minutes drive and an ideal opportunity to daydream about upcoming sewing projects. Suddenly I knew I wanted to make a maxi skirt out of this fabric. I made a pattern and the entire skirt that evening. Hurray for instant gratification projects!


Maxi06


De foto’s zijn gemaakt tijdens een tussenstop onderweg naar het werk. Ja, ’s ochtends vroeg. Dus als ik er een beetje moe uitzie, dan weet je waarom 😉


I stopped on the way to work to take these photos. Yes, early in the morning. So if I look a bit tired, you know why 😉


Maxi05


Op deze foto zie je goed hoe het patroon in elkaar zit (en dat ie wat te groot is uitgevallen, haha. Ach, iets om aan te passen voor de volgende keer!). Het is een hele basic rechte rok met een pas. De pas is dubbel gevouwen en zo aan de rok vast genaaid. Super simpel, en snel. En comfortabel. En precies wat ik in gedachten had.


On this picture you can see what the pattern looks like (and that it turned out a bit big at the waist, haha. Ah well, something to fix for the next time!) It is a basic straight skirt with a yoke. The yoke is folded at the top and sewed to the skirt like that. Super easy and fast. And comfortable. And exactly what I had in mind.


Maxi07


De rok loopt ietsje wijd uit aan de onderkant. Precies genoeg om er makkelijk in te kunnen lopen zonder dat de zoom uitrekt. Die heb ik voor het gemak maar weer met een rechte steek genaaid, net als bij mijn meest recente Lady Skater jurk. Want waarom moeilijk doen als het makkelijk kan?


The skirt flares out just a bit towards the bottom. Just enough to be able to walk easily without stretching the hem. So I used a straight stitch again, just like on my latest Lady Skater dress. Because why make things difficult when they could be easy, right?


Nu even over het dragen van deze rok. Ik dacht altijd dat maxi rokken niks voor mij waren. Ik ben niet zo groot en ik dacht dat ik daardoor nog kleiner zou lijken. Maar toen ik deze aantrok (en over de teleurstelling van de te wijde heuppas heen was 🙂 ) merkte ik hoe fijn dat eigenlijk zit. En hoe elegant dat voelt, de stof die langs je benen beweegt als je loopt. En hoe ‘put together’ zo’n rok voelt terwijl het tegelijkertijd voelt alsof je je pyjamabroek aanhebt. En ik hoef jullie vast niet meer te vertellen hoe een fan van pyjamas ik ben. Ik ben om, maxirokken FTW!


So a thing about wearing this skirt. I alwayw thought maxi skirts were not for me. I am not very tall and I always worried that they would make me look small and frumpy. But when I tried this one on (and after the initial dissapointment that the yoke was too big 🙂 ) I noticed how comfortable maxi skirts are. And how elegant it makes you feel, the fabric floating along your legs when you walk. And how ‘put together’ it feels while at the same time it feels like you’re wearing you pj bottoms. I’m sure I don’t have to tell you that I am a big fan of pj’s. I am sold, maxi skirts FTW!


Maxi02

feeling all elegant…


Maxi03

… and sassy!


Altijd fijn om zoiets te ontdekken aan het eind van de zomer. Volgend jaar meer, denk ik 😉 Wat is jouw ontdekking van deze zomer, op kleding/naai-gebied?


Always nice to discover such a thing at the end of summer. There will probably be more of these skirts next year 😉 What’s your fashion/sewing discovery of the summer?

Sad skater, happy skater

Eerst was ik zo happy met mijn Lady Skater jurkenmaar helaas nam dat vrij snel af. Door de vorm van de rok rekte de stof aan de zijkanten uit waardoor de onderkant ongelijk werd. En omdat ik ze heb gezoomd met behulp van dat plastic gaas dat smelt door je strijkijzer, kan ik de zoom niet even loshalen en opnieuw doen 😦 Bovendien gebeurde met de paars gestippelde dit:

At first I was so happy with both of my Lady Skater dresses, but unfortunately the happiness faded quite soon. Because of the cut of the skirt it sagged at the sides, which made the hem uneven. I hemmed them with help of some fusible webbing, so I couldn’t just unpick and redo them 😦 on top of that, this is what happened to the purple dotted one:


Sad skater dress

Sad skater dress


Het zwart wordt helemaal grijs, na drie keer wassen al!


The black fades pretty badly, after just 3 washing cycles!


Dus, tijd om een nieuwe te maken.


So, a new one was in order.


Happy skater dress!

Happy skater dress!


Aan deze jurk begon ik al een poos terug, nadat ik het patroon wat had aangepast. Ik verhoogde de taille een beetje, verlaagde de halslijn een beetje, en verlengde de rok een beetje. Nadat ik hem inelkaar had gezet bleek dat de taille toch nog wat te laag was. Dus ik knipte de taillenaad er weer af met een centimeter extra, en naaide het bovenlijfje en de rok weer aan elkaar. Toen was het perfect.


This dress was cut out a while ago, after adjusting the pattern. I raised the waist a bit, lowered the neckline a bit, and lengthened the skirt a bit. After I sewed the dress, I found out that the waist was still a bit low, so I cut off the waist seam with an extra centimeter and sewed the bodice and the skirt back together. Turned out perfect.


HappySkater05


En, heel belangrijk, ik besloot om voor het zomen de rok flink uit te laten hangen, zodat ik niet weer een ongelijke zoom zou krijgen. Een week of 4 leek me wel genoeg 😉


And, very important, I decided to let it hang for a while before hemming, to prevent the skirt from sagging again. Like, about 4 weeks 😉


HappySkater3


Het resulteerde in een jurk waar ik erg blij mee ben. De stof is een katoenen tricot, de basis is zwart en het tijgervelletje is erop geprint. Ik denk niet dat deze zo verkleurt als de paars gestipte.


The result is a dress I’m very happy with. The fabric is a cotton jersey, the fabric is black and the brown/orange parts are printed on. I don’t think this will fade like the purple dotted one did.


HappySkater02


Deze jurk valt zeker weten in de ‘secret pyjamas’-categorie 😉


This dress is most definately one in the ‘secret pyjamas’- category 😉


Details


HappySkater06


De halsbies deed ik anders dan de instructies voorschrijven. Kitschy Coo vertelt je om eerst één schouder te naaien, dan de halsbies aan te zetten, en vervolgens de andere schouder inclusief halsbies te naaien. Maar dat vind ik niet zo mooi, ik vind het mooier als de ‘sluiting’ van de bies middenachter zit. Dus deed ik het op de Sewaholic Renfrew manier: schouders naaien, bies dicht naaien, en vervolgens met een beetje rekken en strekken in elkaar zetten.


The neck binding is not applied in the way the instructions tell you to. Kitschy Coo tells you to stitch one shoulder, sew on the neck binding and then sew up the other shoulder and the binding in one go. I don’t like the way that looks, I prefer the binding seam to be at center back. So I sewed it on the Sewaholic Renfrew way: Sew both shoulder seams, sew the binding separately and then stitch them together in the round. 


Happyskater07


De zoom deed ik met een gewone rechte steek. Aangezien de rok zo wijd is kan ik me niet voorstellen dat die naad ooit uitgerekt wordt, dus waarom dan ingewikkeld doen met een zig-zag steek of een tweelingnaald? Ik zette de steeklengte wel op iets langer (3.0) en rekte de stof een beetje tijdens het naaien. Zo is de zoom toch nog een klein beetje rekbaar.


For the hem I used a regular straight stitch. The skirt is so wide, I don’t think the hem will ever stretch. So why bother with a zig-zag stitch or a twin needle? I did set the stitch length to be a bit longer (3.0) and stretched the fabric a bit as I sewed it. This way there is a bit of stretch at the seam.


HappySkater01


Ik zit nu al te denken aan manieren om verschillende versies van dit patroon te maken – en dan niet met verschillende mouwlengtes, maar er bijvoorbeeld een wikkeljurk van te maken, of net als Clo een lage ruglijn. Zo simpel maar zo leuk bedacht! Nu alleen nog mooie tricots vinden, want daar heb ik niet zo veel van in voorraad. Vervelend hoor 🙂

Ik ben wel benieuwd, heb jij ook een patroon waar je al veel variaties van hebt gemaakt en/of op bedacht?


So now I’m thinking of ways to make different versions of this pattern. Not by making it with long or short sleeves, but by turning it in to a wrap dress. Or by adding a low back neckline like Clo did here. Such a simple but smart idea! All I need to do is look for some nice jersey fabric, because I don’t have much of that in my stash. Hard work 🙂

I’m curious: is there a pattern that you have made lots of different /hacked versions of?


The community support Bombshell bathing suit

Dit badpak heeft even geduurd. De stof kocht ik vorig jaar juli, en in september knipte ik de patroondelen uit. Vervolgens lag het de hele winter te wachten tot ik er eindelijk aan begon. In mei las ik over Karen’s Sporty Summer Sewathon en dat gaf mij precies de motivatie die ik nodig had om er eindelijk aan te beginnen. Het ging best voorspoedig.

Totdat…


This suit has been in the making for quite a long time. I bought the fabric in july last year, and cut the pattern out in september. Then it laid there for the entire winter, waiting to be made up. In may I read about Karen’s Sporty Summer Sewathon and that was the perfect kick in the but to get me started. Things went swimmingly ( 🙂 ).

Untill….


http://instagram.com/p/pB0mEIEe6C/


Oeps. Balen, dacht ik, maar ik had nog wat restjes en dan knip ik gewoon een nieuwe. Ja niet dus. Die restjes had ik heel enthousiast weggegooid tijdens het herinrichten van mijn naaikamer


Oops. Bummer, I thought, but I figured I had some remnants of this fabric so I’ll just cut a new piece. Wrong! I tossed them while reorganising my sewing room


Je raadt het al, toen bleef het badpak weer een poosje liggen. Totdat ik Lieke’s Swimwear week inspiration post las. Nog dezelfde avond bestelde ik een extra stuk badpakstof. En nog een andere erbij, vanwege het minimale bestelbedrag (perfect excuus). Zodra de postbode het bezorgd had ging ik weer aan de slag. En na 11 maanden was mijn badpak dan eindelijk klaar!


You can probably guess what happened next, the swimsuit got put into the drawer again. Untill I read Lieke’s Swimwear week inspiration post. I immediately ordered some more of the swimsuit fabric. And some other fabric too, due to the minimal order size (perfect excuse). As soon as the mail man delivered the fabric the swimsuit came out of the drawer. And after 11 months the swimsuit was finally done!


Bombshell01


Het patroon is de Bombshell van Closet Case Files. Ik maakte een maat 10 aan de bovenkant en een 12 bij de heupen. Beter was geweest om helemaal een maat 10 te maken want het lubbert een beetje bij mijn billen. Zelfs nadat ik het wat innam via de middenachternaad. Ach, volgende keer beter!


This is the Bombshell pattern from Closet Case Files. I made a size 10 on top and graded out to a 12 at the hips. It probably would have been better to make a straight 10 because it’s a bit saggy at the bottom. Even after taking it in a bit though the center back seam. Ah well, next time!


Bombshell02

saggy bottom 🙂


Dit is een heel comfortabel badpak. Het zit strak genoeg zodat ik me geen zorgen maak over afzakken, maar door de gerimpelde stukken tekent het niet. De badpak cups die ik erin verwerkte zorgen voor wat stevigheid bij de buste en voor wat camouflage voor de gevolgen van koud water 😉 Ook als ‘ie nat is blijft alles netjes zitten, dat heb ik getest… onder de douche!


This turned out to be quite a comfortable bathing suit. It’s tight enough not to worry about it dropping, but because of the gathers it also doesn’t cling. It’s pretty flattering I think. The swimsuit cups I put in provide some support at the bust and camouflage cold water effects 😉 It also stays perfectly put when wet, which I tested… in the shower!


Bombshell03


Het maken van dit badpak was een stuk gemakkelijker dan ik van tevoren dacht (story of my life, haha!). De sewalong van Closet Case Files droeg daar voor een groot deel aan bij. Het rimpelen van de badpakstof vond ik wel vrij irritant om te doen, vooral omdat mijn voeringstof erg dun en flutterig was. Het was lastig om de voering en de gewone stof netjes aan elkaar te spelden en het naaien was helemaal vervelend, omdat de voering niet recht wilde blijven liggen en er daardoor steeds stukken per ongeluk werden meegenaaid in de naad. Mijn tornmesje heeft een flinke bijdrage geleverd aan dit badpak!


Making this was way easier that anticipated (story of my life, haha!). The sewalong was a tremendous help. The only thing that was pretty annoying was gathering the fabric. The lining fabric was flimsy and it was hard to pin it neatly to the gathered main fabric. Sewing it up was even more annoying because the lining wouldn’t stay put and parts of it got cought up in the seam. My seam ripper got a good workout with this one!


Bombshell04


Speciaal voor dit project kocht ik een boventransportvoetje voor mijn naaimachine. Die had ik al bij de vorige en dat is ideaal voor dunne rekbare stoffen. Omdat mijn lockmachine niet zo’n fan is van elastiek naaien en het ook niet zo goed doet op ‘kruispunten’ van naden, maakte ik dit badpak voor het grootste deel gewoon op de naaimachine, en dat ging prima. Als je dat ook wilt doen zou ik zeker weten een boventransportvoetje aanschaffen, ik denk dat het zonder dat ding niet gelukt was dit badpak te maken.


I bought a walking foot for my machine. I had one with my old machine too and it’s great for flimsy stretchy fabrics. My overlocker isn’t a fan of elastics and is also not that good at sewing seam intersections, so I mainly made this on my sewing machine and it was just fine. If you want to do the same, I stronly recommend getting a walkong foot too though. I don’t think this bathing suit would have turned out like this if I hadn’t used it.


Ik ben heel, heel bij met mijn badpak. Het zit heerlijk, voelt helemaal niet bloot, en ik vind ‘m gewoon heel mooi geworden 🙂

I am really, really happy with my bathing suit. It’s comfortable, doesn’t feel revealing at all and I just like how it looks very much 🙂


http://instagram.com/p/rCE_XgEe6u/

Al moest ik wel even lachen toen ik dit zag tijdens het naaien!

Even though I had a small WTF-moment when I saw this!


Sunshine on a cloudy day

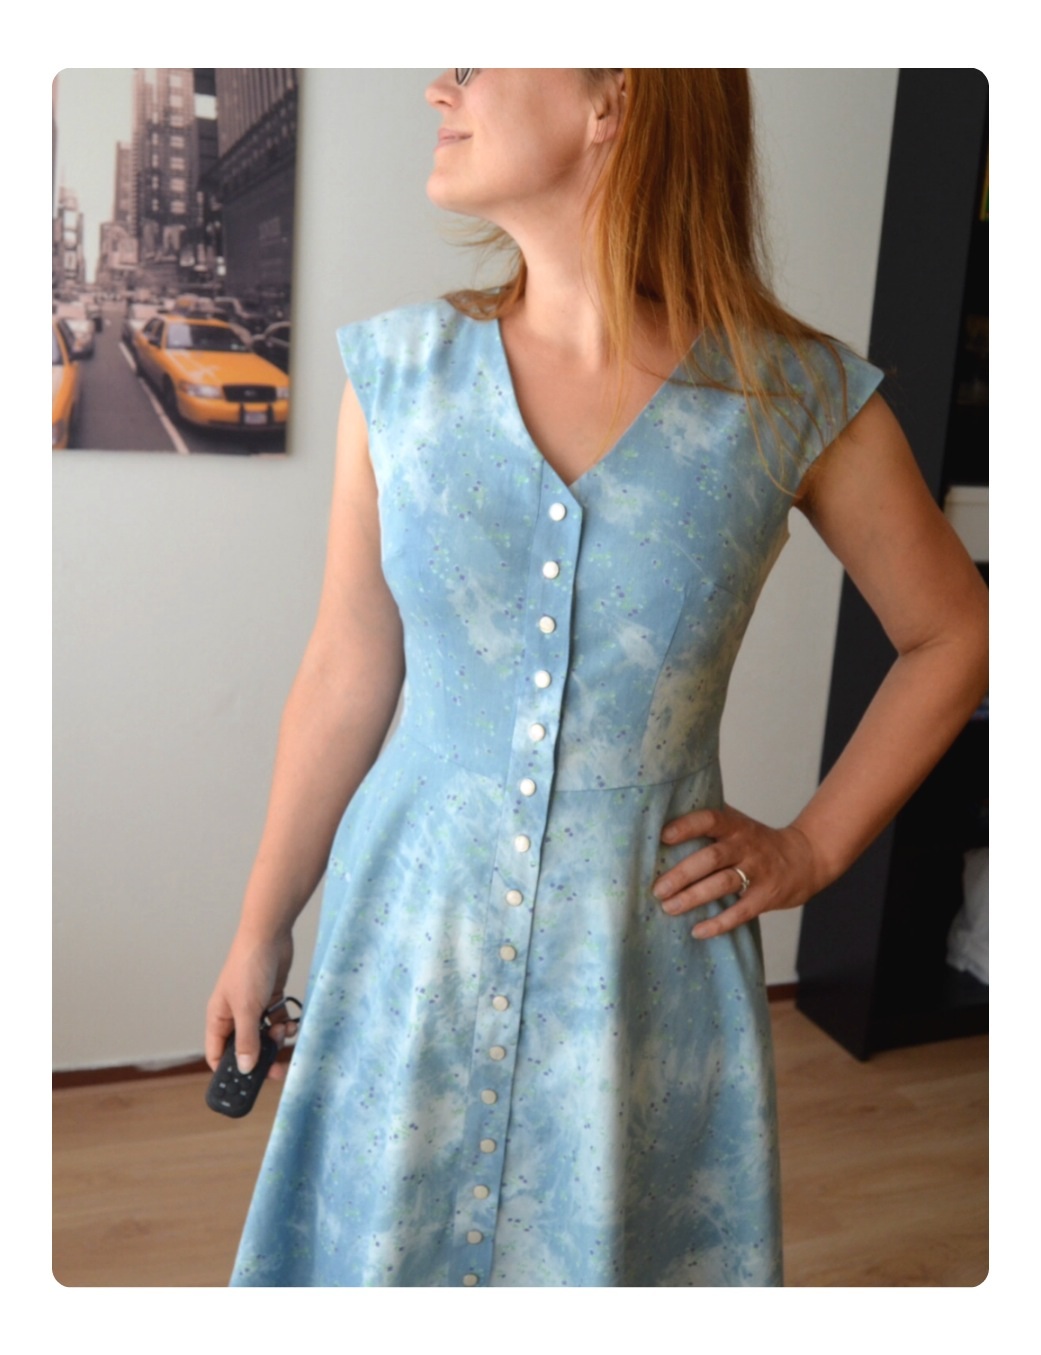
Dit hoef ik jullie vast niet meer te vertellen: ik ben een ontzettende fan van de shirtdress, oftewel de hemdjurk/doorknoopjurk. Waarom klinken de namen van kledingstukken in het nederlands vaak zo veel lomper dan in het engels? In dezelfde categorie: de broekrok 😦

Oke, terug naar het onderwerp. Tijdens het Stoffenspektakel afgelopen voorjaar kocht ik een heel licht en dun spijkerstofje met kleine bloemetjes en een soort tie-dye vlekken erop. Ik wilde er eigenlijk een mouwloze Camí van maken. Maar toen ik dit patroon had gemaakt besloot ik dat dit stofje perfect was voor dit model, maar dan wel met een knoopsluiting die ook doorloopt op de rok en een ‘echte’ knoopsgatenbies.


This is something I probably don’t have to tell you: I am a big fan of shirtdresses. During the bi-annual big fabric market last spring I bought this very light denim, with a tiny floral print and some tie-dye like stains. I intended to make a sleeveless Camí dress with it, but after making this pattern I decided this fabric was perfect for another version of it. This time one with a ‘real’ button placket that extends all the way down.


clouds08


Een knoopsgatenbies maken is heel makkelijk, vooral als je een beetje slim de breedte bepaalt. Mijn bies is twee keer de naadtoeslag breed, 3 cm in dit geval. Wat je doet is het volgende:

– maak een bies door de laatste 1,5 cm van middenvoor te kopiëren en nog 1,5 cm door te trekken.

– teken een lijn precies in het midden van de bies (op, jawel, 1,5 cm dus 🙂 ). Dit is je nieuwe middenvoor, hier komen de knopen.

– teken nog een keer precies dezelfde bies maar dan in spiegelvorm eraan vast, zodat je bies ook een achterkant heeft. Teken de naadtoeslag.

– herhaal bovenstaande bij de voorkant van je rokdeel.

– knip je bovenlijfje niet op de stofvouw maar twee keer, zonder extra naadtoeslag toe te voegen aan de middenvoor. De laatste 1,5 cm van je bovenlijfje zit nu immers in de knoopsgatenbies verwerkt en is daardoor de naadtoeslag geworden :). Hetzelfde geldt voor de voorkant van je rokdeel.

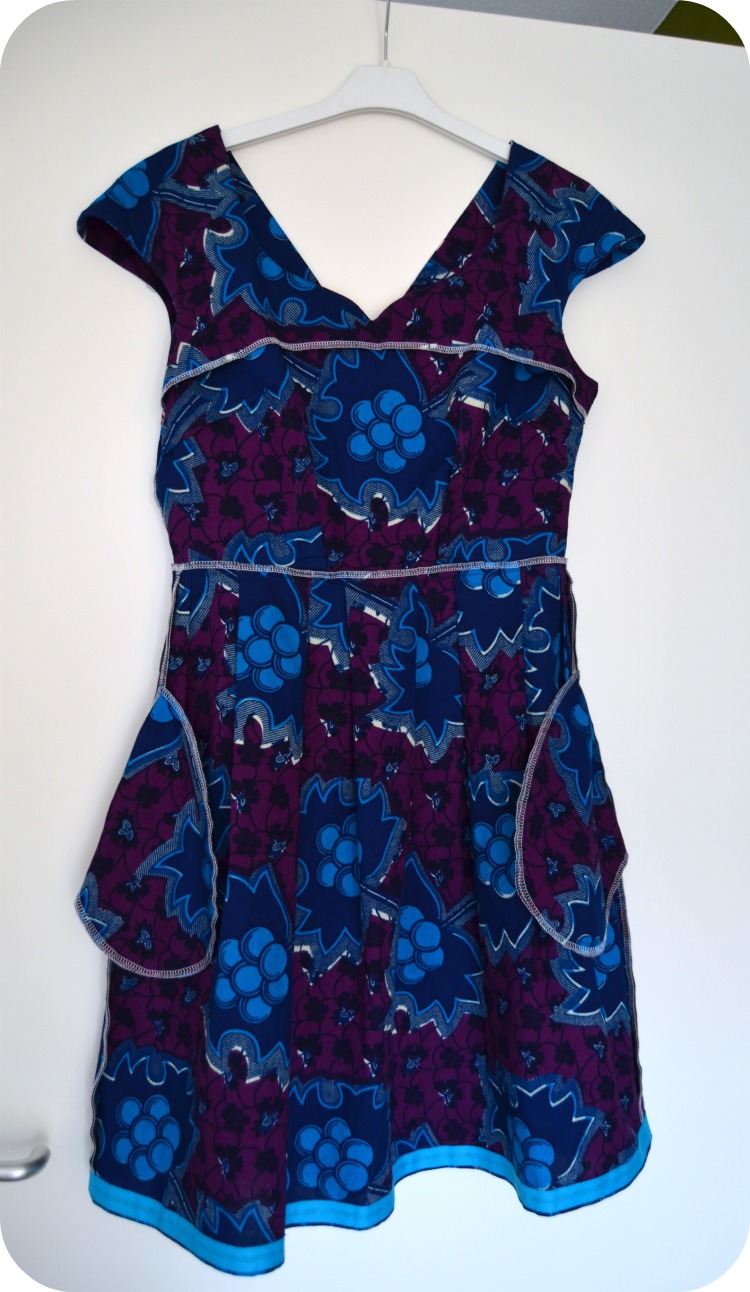
Zo ziet het eruit (woohoo, Paint skills haha):


knoopsgatenbies


Making a button placket is quite easy, especially if you use a clever width. I made mine twice the seam allowance, so in total 3 cm. What you need to do is this:

– create a placket by copying the last 1,5 cm from your center front bodice piece, and extend it another 1,5 cm.

– draw a line exactly in the middle of the placket (at, yes, 1,5 cm 🙂 ). That’s the new CF and that’s where your buttons go.

– draw a mirrored placket attatched to the one you just made, this will be the facing. Add seam allowances.

– repeat this process with you skirt front.

– when cutting out your pattern,  cut your front bodice out twice instead of on the fold. Don’t add extra seam allowance. The last 1,5 cm of the CF are now in the button placket and so they have become seam allowance :). This also goes for the CF skirt.

Your bodice front should look like the above drawing (woohoo Paint skills, haha)


clouds05

I really, really need a haircut…


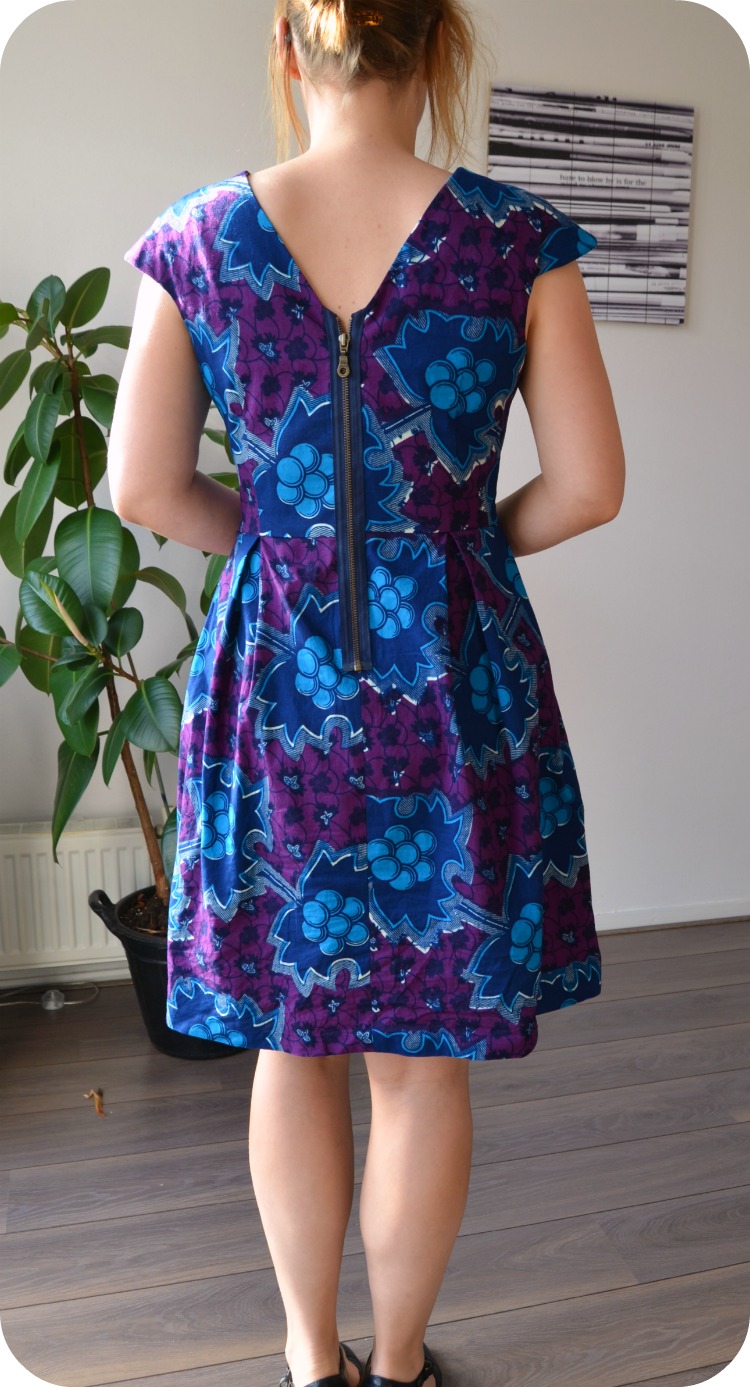
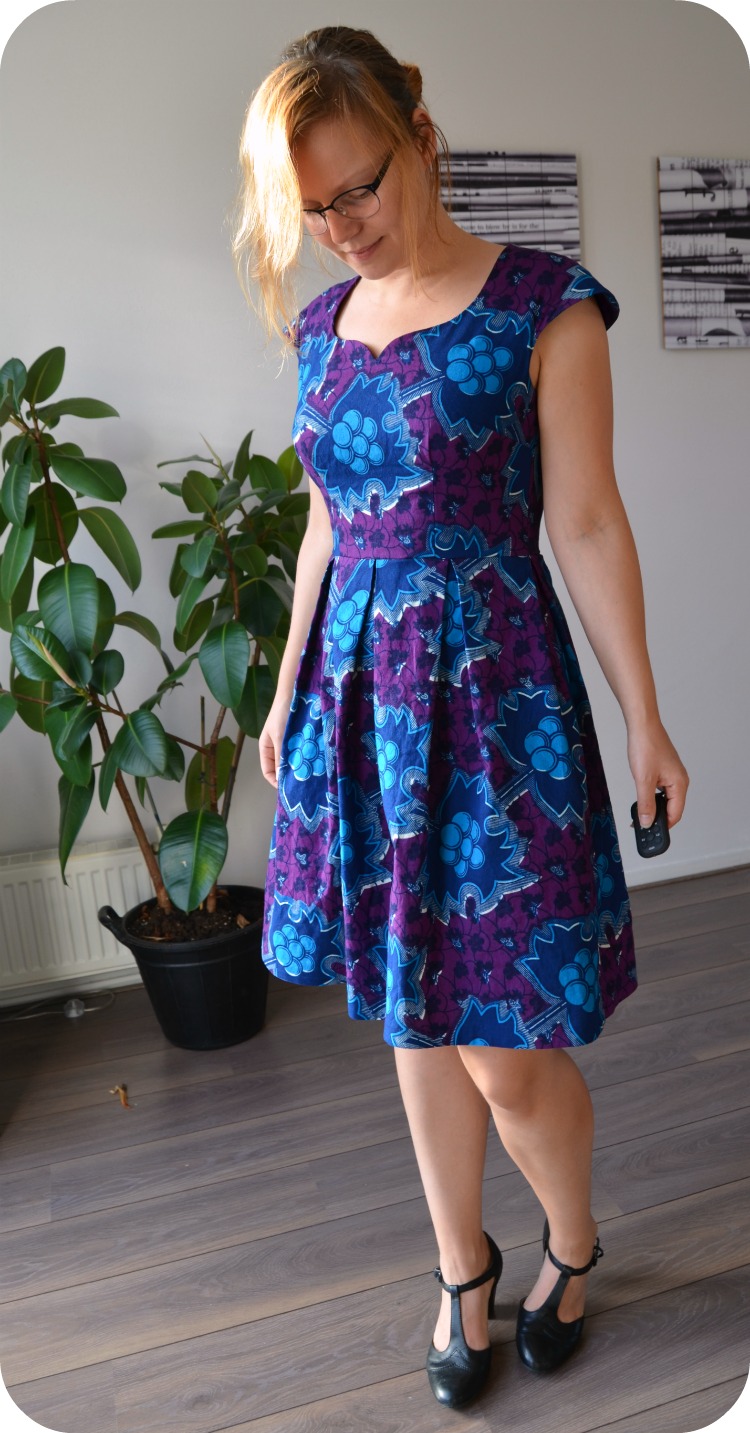
Het is een heel fijn jurkje geworden, door de lichte stof draagt het erg prettig en het kreukt bijna niet. Ideaal ook om mee te nemen op vakantie straks! Toen ik de stof kocht dacht ik dat de lichte vlekken ge-tie-dye-d waren, maar tijdens het strijken na het voorwassen kwam ik erachter dat het van bleek was. Stinken!


This turned out to be a very comfortable dress, because of the lightweight fabric. And it almost doesn’t wrinkle, which makes it perfect for the upcoming holidays. When I bought the fabric I thought the stains were tie-dyed but when I ironed the fabric after prewashing it, it turned out it was bleached. It smelled horrible!


clouds03

Als ik dit jurkje opnieuw zou kunnen maken zou ik een aantal dingen anders doen:

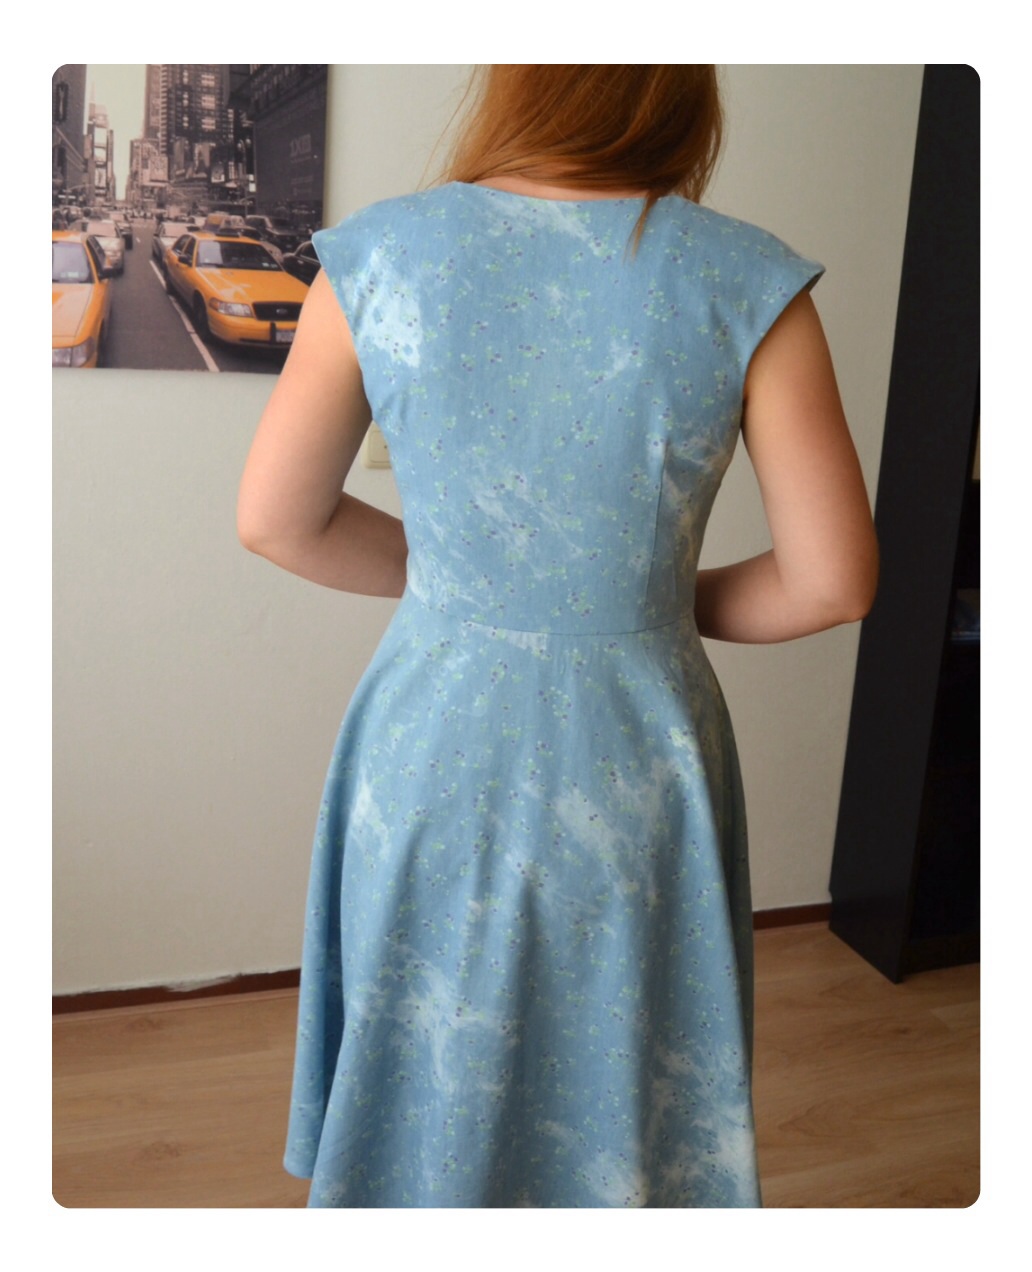
– de figuurnaden aan de zijkant hebben een bobbeltje aan het eind. Dat was ook al zo bij het rode exemplaar van deze jurk. Ik heb gegoogeld waar dit door kan komen en ik denk dat ze te ‘breed’ zijn. Door in mijn patroon een cm van de figuurnaad aan de zijkant naar de figuurnaad bij de taille te roteren zou dit beter moeten worden

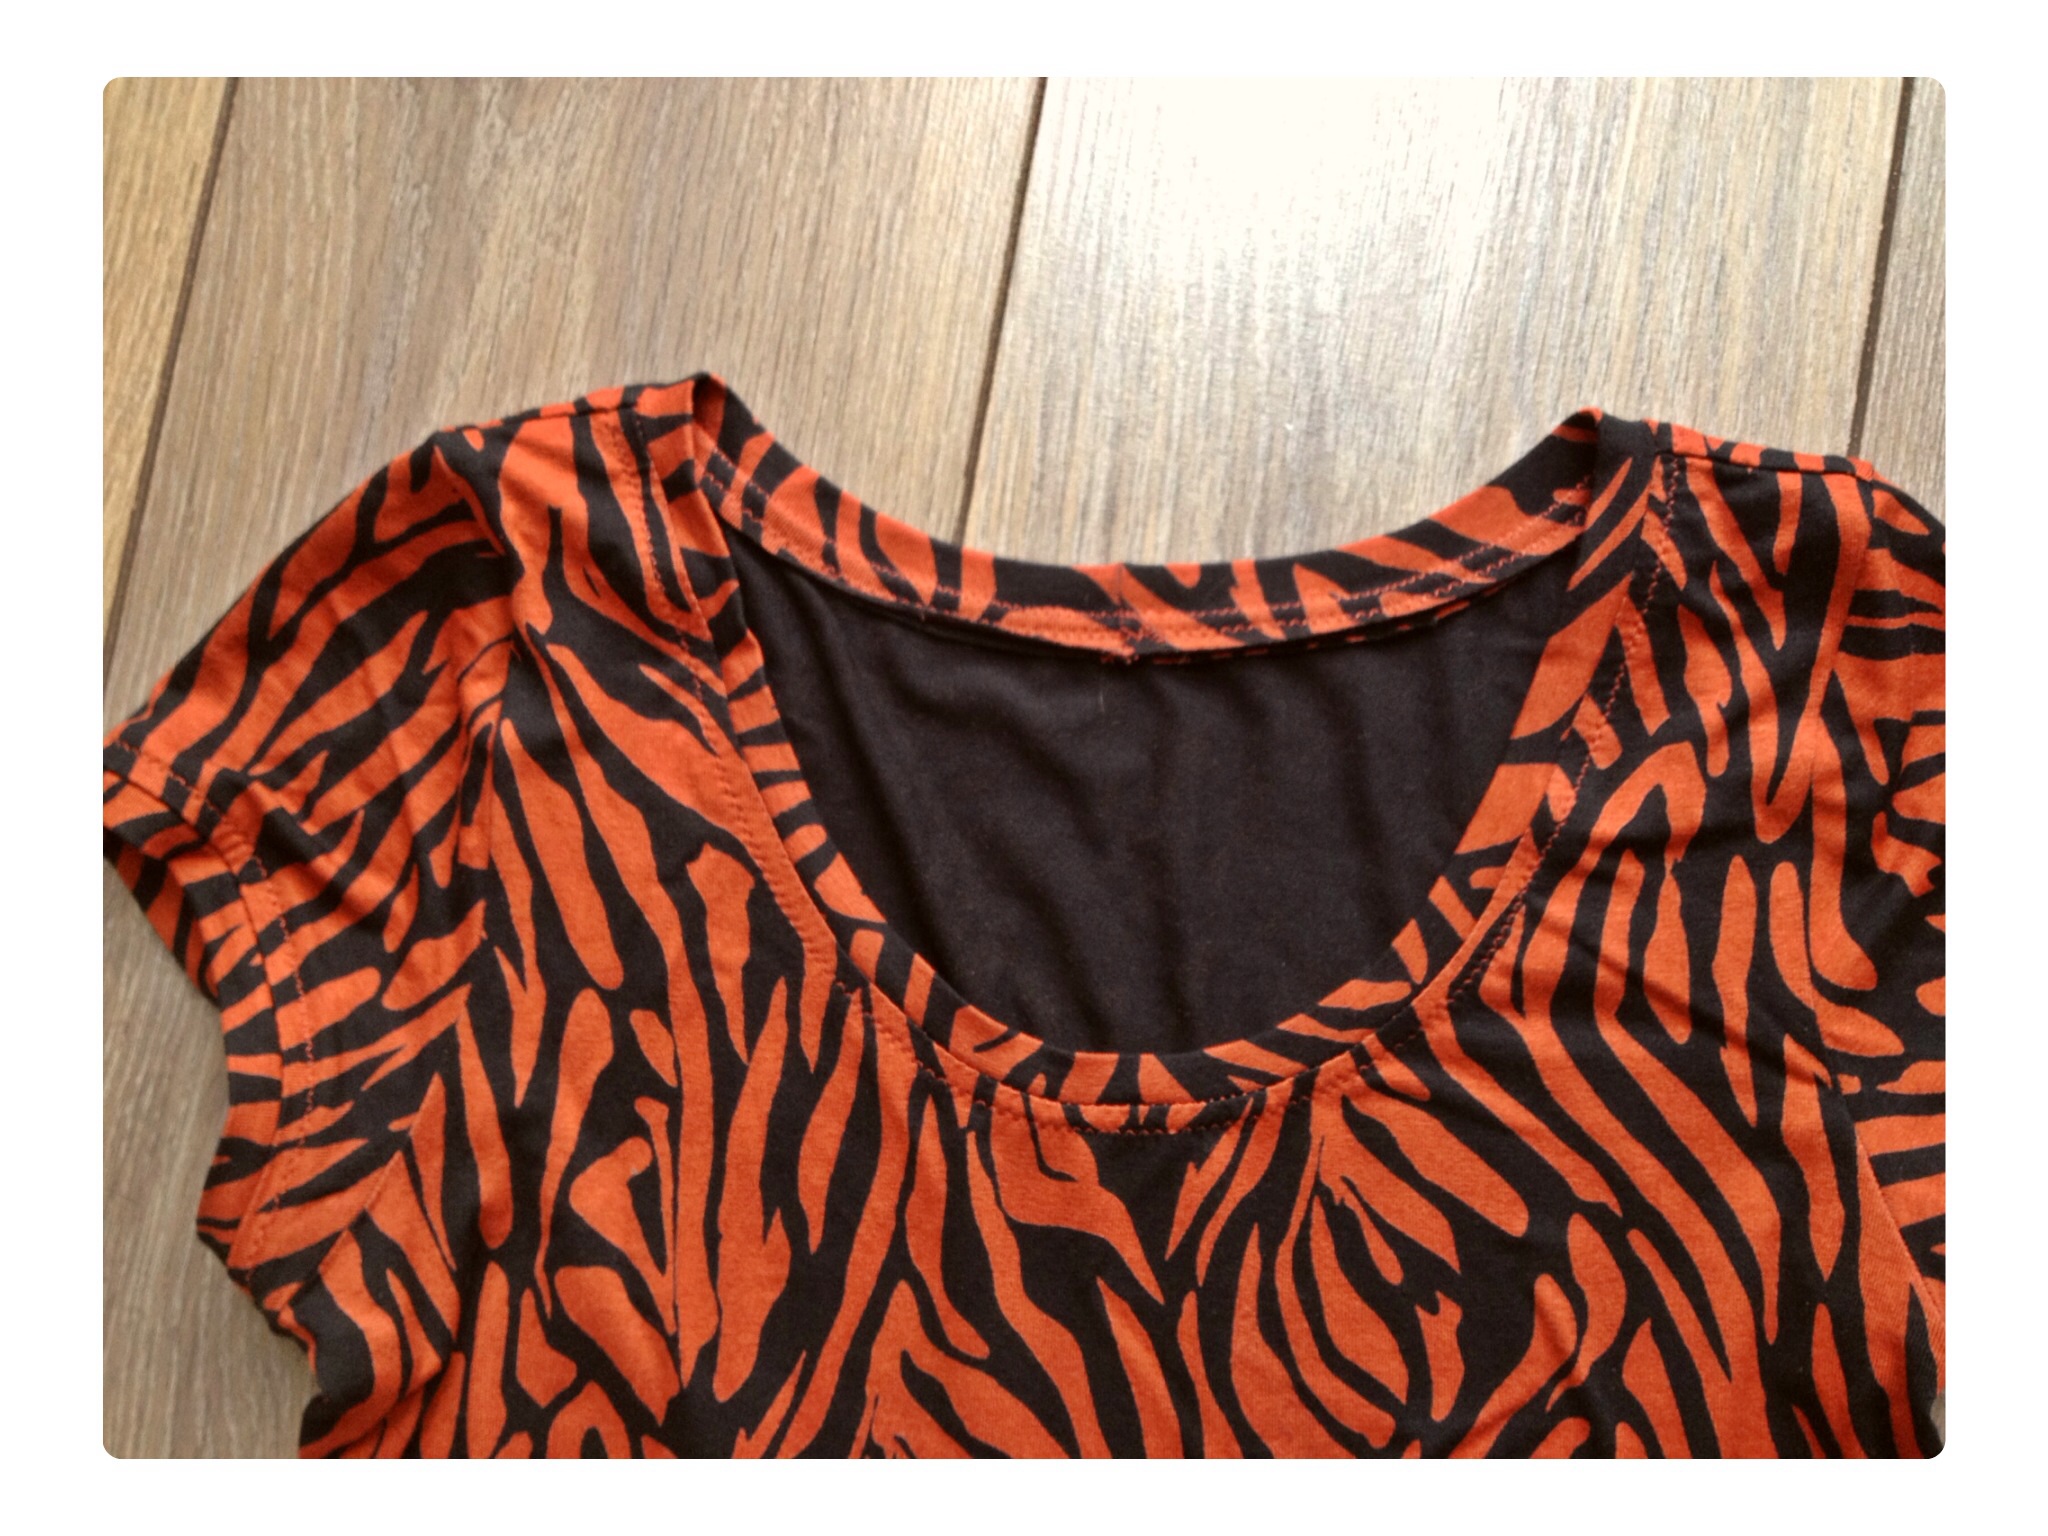
– ik ben vergeten om het beleg te ‘understitchen’ waardoor die soms wat zichtbaar is. Oeps. Ik ben dit keer overigens niet vergeten om de halslijn te ‘staystitchen’, en daardoor zit die een stuk beter. Hoera!

– de armsgaten toch een klein beetje uitdiepen. Ze zitten niet te strak maar bij het rode exemplaar van deze jurk komen er steeds deodorantvlekken in. Dat zal bij deze jurk wel iets minder opvallen door de kleur, maar jakkes!

– de drukknoopjes écht recht onder elkaar zetten in plaats van een beetje wiebelig scheef 🙂


clouds06


If I made this dress again I would change a couple of things:

– the side darts are a bit ‘nipply’. This is also the case in the red dress I made from this pattern. I googled this and I think this is due to the dart being too wide. I transfered about a cm from the side dart to the waist dart, which should fix this issue.

– I forgot to understitch the facing, they peek out a bit. Oops. However, this time I didn’t forget to staystitch the neckline and it turned out pretty good. Yay!

– lower the armscyes just a tad. It’s not too tight or anything but I noticed in my red dress that my deodorant stains on them. I don’t think it will be that bad in this dress because of the lighter colour but still, yuck!

– place the snaps in a straight line under each other instead of a wobbly one 🙂


clouds04


Dat is best veel kritiek, maar het is niet zo dat ik niet blij ben met deze jurk. Ik merk dat ik, doordat ik het patroon zelf heb gemaakt, veel kritischer ben dan wanneer ik iets maak van gekochte patronen. Dat hoort denk ik bij het leerproces, en maakt de resultaten uiteindelijk alleen maar beter.

Wat ook bij het leerproces hoort volgens mij is steeds beter letten op en de tijd nemen voor details. Zoals bijvoorbeeld de onzichtbare handgenaaide zoom en dichtgenaaide knoopsgatenbies, en de handgenaaide ritsen in mijn voorgaande jurken. Zou het zo zijn dat, als we de ‘basics’ onder de knie hebben, we ons steeds meer richten op het perfectioneren van de details? Hoe gaat dat bij jou, hoe loopt jouw leerproces?


That’s a lot of critical remarks. Does that mean I’m not happy with this dress? Not at all! However, because I made this pattern myself I am way more critical then when I’m using a bought pattern. I think that’s part of the learning process, and it only makes for better results in the end.

Something that’s probably also part of the learning process is having more of an eye for, and taking more time to pay attention to detail. Like the invisible, handsewn hem, the slipstitched button placket and the handpicked zippers in my previous dresses. Could it be that, when we’ve got the ‘basic’ skills covered, we tend to pay more and more attention to perfecting the little details? how does this work for you, how does your learning process go?


Details


clouds02

clouds01


Ook deze jurk is afgewerkt met een all-in-one beleg. Zonder vlieseline, omdat het zo’n lekker soepel stofje is en ik dat niet stijver wilde maken. En zonder ‘understitching’ dus, maar dat was niet helemaal zoals bedoeld.

Another all-in-one facing. Without fusible interfacing, because this fabric has such a nice drape and airyness and I didn’t want that to get lost. And without understitching, but that was not as intended.